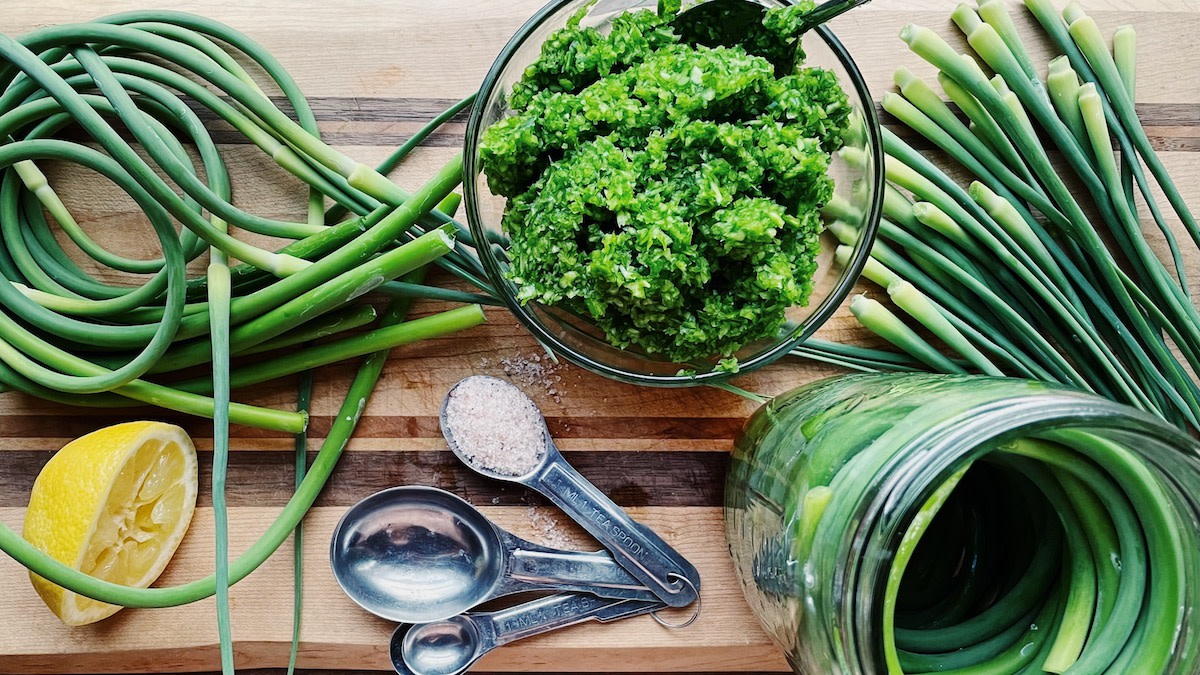
Fermented Garlic Scapes

Prep time
10 minutes
Cook time
-
Course
Preserves
Skill level
Intermediate
Trying to imagine my life without garlic is like trying to imagine my life in black and white. Garlic, second maybe only to salt, is elemental in what Jim Harrison coined “living vividly,” which is the closest thing I’ve got to religion, making garlic something of a sacrament—a daily one, in my case.
The trouble with this is that garlic takes up a lot of space in the garden, takes a long time to grow, and there’s onlyone harvest of bulbseach year that I then have to use sparingly enough to get me by till the next summer. I can never seem to grow enough to last me that long and I’m inevitably forced to buy the desiccated, sprouting bulbs from the grocery store if I can’t schmooze my way into a local farmer’s stash.
Enter, the solution: scapes. The scape is the young flower stalk of hardneck varieties of garlic that emerges in late spring or early summer. Picking these scapes while they’re still tender serves two purposes: It prevents the garlic from flowering, which sends all of its energy back underground to grow you a fatter bulb, and it gives you, essentially, a whole other garlic harvest.
The scapes are milder in flavor than the pungent bulbs, making them perfect for those just dipping their toes into living vividly. They’re a crunchy, juicy, flavorful green vegetable, perfect for stir-frying and grilling, but after a few meals of that, I like to capitalize on this bonus harvest by making it last all year, and my favorite way to do that is by fermenting.
You can cut the flowering tips off and coil the whole scapes around to fit snugly inside the jar to lacto-ferment them whole to use as pickles, but to get the most bang for my buck, I like to make a fermented paste. This paste can then be spooned, all year long, into sauces, soups, dressings, and dips, dolloped onto eggs, and schmeared onto breads. It’s become my go-to pick me up for anything that needs the lift of garlic, meaning, almost everything.
Ingredients
- 1 lb. garlic scapes
- 1½ tsp sea salt
- 1½ tbsp. fresh lemon juice
Preparation
- Cut the flowering tops off the stems and set them aside to infuse into vinegar for vivid salad dressings and pickling liquids. They’re too fibrous to puree into a paste, anyways.
- Cut the stems into rough pieces to fit into your food processor.
- Add half of the scapes, salt, and lemon juice into the processor and blend into a coarse paste.
- Add the remaining ingredients and blend again, scraping down the sides once or twice, until everything is evenly blended to a rough, spreadable consistency.
- Pack the paste tightly into a quart jar. It’ll be a tight fit - if it’s too tight, scoop out a spoonful or two and add to whatever you’re making for dinner that night. The paste should become juicy with it’s own brine, so you’ll want to leave some headspace in the jar for that.
- Use a fermentation weight or a plastic bag full of water to keep the paste below the liquid level of the brine, then place a lid or a fermentation lid on, loosely, so that overflow can escape as fermentation starts to get active.
- Place the jar in a bowl or a dish to catch the overflow, and set on a cool counter or shelf, out of direct sunlight.
- Check the jar daily to make sure the solids are submerged.
- Start tasting the paste after one week. It should turn from emerald green to a lighter, pickled green. It should taste pungent but not too sharp, and sour but not bracing.
- I am usually happy with the flavor of mine around day 10 to 14, when I then put the jar in the fridge, where it will keep for up to a year, if it lasts that long, which it probably won’t.
Shop
Sign In or Create a Free Account
Related
Recipes
Garlic Mustard Stuffed Chicken
(1)
Recipes
Venison Tenderloin with Garlic Butter
(6)
Recipes
Sautéed Fish with Lemon-Garlic Butter
(1)Reviews
Fermented Garlic Scapes
Prep time
10 minutes
Cook time
-
Course
Preserves
Skill level
Intermediate
Trying to imagine my life without garlic is like trying to imagine my life in black and white. Garlic, second maybe only to salt, is elemental in what Jim Harrison coined “living vividly,” which is the closest thing I’ve got to religion, making garlic something of a sacrament—a daily one, in my case.
The trouble with this is that garlic takes up a lot of space in the garden, takes a long time to grow, and there’s onlyone harvest of bulbseach year that I then have to use sparingly enough to get me by till the next summer. I can never seem to grow enough to last me that long and I’m inevitably forced to buy the desiccated, sprouting bulbs from the grocery store if I can’t schmooze my way into a local farmer’s stash.
Enter, the solution: scapes. The scape is the young flower stalk of hardneck varieties of garlic that emerges in late spring or early summer. Picking these scapes while they’re still tender serves two purposes: It prevents the garlic from flowering, which sends all of its energy back underground to grow you a fatter bulb, and it gives you, essentially, a whole other garlic harvest.
The scapes are milder in flavor than the pungent bulbs, making them perfect for those just dipping their toes into living vividly. They’re a crunchy, juicy, flavorful green vegetable, perfect for stir-frying and grilling, but after a few meals of that, I like to capitalize on this bonus harvest by making it last all year, and my favorite way to do that is by fermenting.
You can cut the flowering tips off and coil the whole scapes around to fit snugly inside the jar to lacto-ferment them whole to use as pickles, but to get the most bang for my buck, I like to make a fermented paste. This paste can then be spooned, all year long, into sauces, soups, dressings, and dips, dolloped onto eggs, and schmeared onto breads. It’s become my go-to pick me up for anything that needs the lift of garlic, meaning, almost everything.
Ingredients
- 1 lb. garlic scapes
- 1½ tsp sea salt
- 1½ tbsp. fresh lemon juice
Preparation
- Cut the flowering tops off the stems and set them aside to infuse into vinegar for vivid salad dressings and pickling liquids. They’re too fibrous to puree into a paste, anyways.
- Cut the stems into rough pieces to fit into your food processor.
- Add half of the scapes, salt, and lemon juice into the processor and blend into a coarse paste.
- Add the remaining ingredients and blend again, scraping down the sides once or twice, until everything is evenly blended to a rough, spreadable consistency.
- Pack the paste tightly into a quart jar. It’ll be a tight fit - if it’s too tight, scoop out a spoonful or two and add to whatever you’re making for dinner that night. The paste should become juicy with it’s own brine, so you’ll want to leave some headspace in the jar for that.
- Use a fermentation weight or a plastic bag full of water to keep the paste below the liquid level of the brine, then place a lid or a fermentation lid on, loosely, so that overflow can escape as fermentation starts to get active.
- Place the jar in a bowl or a dish to catch the overflow, and set on a cool counter or shelf, out of direct sunlight.
- Check the jar daily to make sure the solids are submerged.
- Start tasting the paste after one week. It should turn from emerald green to a lighter, pickled green. It should taste pungent but not too sharp, and sour but not bracing.
- I am usually happy with the flavor of mine around day 10 to 14, when I then put the jar in the fridge, where it will keep for up to a year, if it lasts that long, which it probably won’t.