

Prep time
1 hour 30 minutes
Cook time
30 minutes
Course
Dessert
Skill level
Intermediate
Season
Fall, Winter
Serves
24 cookies
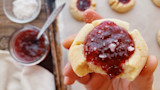
Sometimes when I go to holiday parties I feel like maybe I should get dressed up, but I always end up changing my mind, wiping my lipstick off, and changing back into my flannel shirt before I leave the house. I’ve discovered a workaround, though, for feeling holiday fancy even when I don’t feel like primping—jam thumbprint cookies. Walking into a room with a tray of these little gems, gleaming, I may as well be Liz Taylor, no matter what shoes I’ve got on.
For as dazzling as they look, they’re deceptively low maintenance if you have jam on hand. I most often see raspberry and apricot jam being used, which are among my favorites, but why stop there? I’ve filled my little thumbprint wells with every jam I can think of, and so far, the shining star is rosehip.
It’s vibrant red, but unlike some other red fruit jams, it’s not cloyingly sweet. It’s got substance, it’s got tang, it’s got texture, it’s something akin to an apple, a cherry tomato, a persimmon, but with the sweetness of stonefruits. This jam, partnered with the mild, buttery, biscuity cookie, is the crowning jewel of any holiday meal. If you can’t make the rosehip jam but love a thumbprint cookie, look around for other wild fruits that you could make a jam out of, or maybe a friend already does and you could trade for a jar. Some of my other favorites are currant, chokecherry, and wild plum.
Ingredients
Rosehip Jam1 lb. rosehips, after trimming leaves and stems off 2 cups water 1¼ cup granulated sugar ¾ tsp. powdered pectin Juice of one lemon
Cookie Dough
- 2½ cups all-purpose flour
- ½ tsp. baking powder
- 1 large egg, room temperature
- ½ tsp. vanilla extract (almond is lovely, too)
- 1½ sticks butter
- 1 cup granulated sugar
- ½ tsp. salt
- 1 cup jam
Also works with
Preparation
Rosehip JamThis is using either fresh or frozen rosehips. Dried rosehips can be used to make jam, but I’ve not personally done it. Also to be noted, many rosehip jams incorporate oranges, lemons, and apples for flavor, texture, and mostly, for pectin. I do love the flavor of citrus with rosehips, so I’ve added the lemon juice here, but I chose to share this recipe with powdered pectin instead of apples and oranges because I’ve gotten the most consistently jammy texture. While most times, if my jam doesn’t set, I just smile and call it syrup, but for these thumbprint cookies, a syrup won’t do.
- Rinse your rosehips and trim off all stems and leaves.
- Put rosehips in a stainless steel pot, preferably with a heavy bottom, and simmer until hips are soft—about 30 minutes.
- Run the softened hips, first, through a food mill or strainer and then again through a fine sieve. This part is rather tedious but necessary to get the seeds and fine hairs out that would otherwise be very irritating to the eater.
- Return your liquid to a pot and add the sugar, pectin, and lemon juice. Stir to combine.
- Bring this mixture to a rapid boil and then lower slightly to set at a high simmer for roughly 45 minutes, but check every 15 minutes or so to stir, skim foam, and adjust the heat so as not to scald the bottom.
- After 35 minutes, start checking the temperature with a candy thermometer or a digital read thermometer—you want to reach 220°F for jam.
- When you reach 220°F, pour your hot jam, through a funnel, into a sterilized jar, leaving about ½-inch headspace. If you’re going to use it soon, you can just let it cool and pop it into the fridge. For long-term storage, you can water bath can for 10 minutes.
Thumbprint Cookies
- Preheat oven to 350°F and line two baking sheets with parchment (parchment optional, just nice for jam spills.)
- Whisk together flour and baking powder in a medium bowl.
- In a small bowl, whisk together egg and vanilla or almond extract.
- With either a stand mixer or in a large bowl with a hand mixer, cream the butter, sugar, and salt until fluffy (about 4 minutes).
- Turn the speed down a notch and add egg mixture.
- Turn the speed all the way to low and add the flour mixture slowly.
- Turn the mixer off and scrape down sides and bottom of bowl to make sure all the little bits get incorporated.
- Scoop dough by the rounded tablespoon and roll into a ball with your hands. Place no less than one inch apart on the baking sheet.
- Here’s where most people use their thumb, which I used to do, but I actually find it easier and more effective to use the bottom of the ½-teaspoon measuring spoon. Center the belly of the spoon over the center of the dough ball and push gently down into the spoon with your thumb. The edges of the cookie may crack depending on the moisture and temperate of your dough. I, personally, kind of like the cracks, especially when the jam runs down into them and sort of caramelizes. If you don’t like the cracks, work with a warm and moist dough and while you’re making the “thumbprint” with one hand, gently hold the edges of the cookie together in the other. If any cracks form, they can usually be mended by pinching.
- Spoon the jam into the thumb wells. Fill to level with the top of the cookie if you want a tidy pool of jam, or, mound it a bit for a pool that might overfloweth. The jam will often settle a bit while baking, so I lean toward overfilling, plus I love when it bubbles over the edge. You can always top off the jam after baking, too.
- Bake for 10 to 14 minutes, turning the pan halfway for evenness. 12 minutes is usually the sweet spot for me, but every oven is different. Don’t wait for any significant browning, or they’ll likely be overbaked.
- Wait for the jam to stop bubbling before you take a bite—sugar burns are the worst.
- Optionally, while still a little warm, I like to sprinkle with big flake sea salt and a pinch of fine lemon zest to add an extra punch, crunch, and zing, but they’re still brilliant without this.
- Place on a cooling rack. When completely cool, they can be stored for about a week in a cookie tin.
Shop
Sign In or Create a Free Account
Related
Recipes
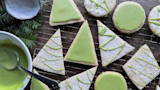
Conifer Sugar Cookies
(1)
Recipes
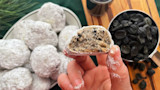
Acorn Sandies
(0)
Recipes
Rosehip Jam Thumbprint Cookies
(0)Reviews
Rosehip Jam Thumbprint Cookies
Prep time
1 hour 30 minutes
Cook time
30 minutes
Course
Dessert
Skill level
Intermediate
Season
Fall, Winter
Serves
24 cookies
Sometimes when I go to holiday parties I feel like maybe I should get dressed up, but I always end up changing my mind, wiping my lipstick off, and changing back into my flannel shirt before I leave the house. I’ve discovered a workaround, though, for feeling holiday fancy even when I don’t feel like primping—jam thumbprint cookies. Walking into a room with a tray of these little gems, gleaming, I may as well be Liz Taylor, no matter what shoes I’ve got on.
For as dazzling as they look, they’re deceptively low maintenance if you have jam on hand. I most often see raspberry and apricot jam being used, which are among my favorites, but why stop there? I’ve filled my little thumbprint wells with every jam I can think of, and so far, the shining star is rosehip.
It’s vibrant red, but unlike some other red fruit jams, it’s not cloyingly sweet. It’s got substance, it’s got tang, it’s got texture, it’s something akin to an apple, a cherry tomato, a persimmon, but with the sweetness of stonefruits. This jam, partnered with the mild, buttery, biscuity cookie, is the crowning jewel of any holiday meal. If you can’t make the rosehip jam but love a thumbprint cookie, look around for other wild fruits that you could make a jam out of, or maybe a friend already does and you could trade for a jar. Some of my other favorites are currant, chokecherry, and wild plum.
Ingredients
Rosehip Jam1 lb. rosehips, after trimming leaves and stems off 2 cups water 1¼ cup granulated sugar ¾ tsp. powdered pectin Juice of one lemon
Cookie Dough
- 2½ cups all-purpose flour
- ½ tsp. baking powder
- 1 large egg, room temperature
- ½ tsp. vanilla extract (almond is lovely, too)
- 1½ sticks butter
- 1 cup granulated sugar
- ½ tsp. salt
- 1 cup jam
Also works with
Preparation
Rosehip JamThis is using either fresh or frozen rosehips. Dried rosehips can be used to make jam, but I’ve not personally done it. Also to be noted, many rosehip jams incorporate oranges, lemons, and apples for flavor, texture, and mostly, for pectin. I do love the flavor of citrus with rosehips, so I’ve added the lemon juice here, but I chose to share this recipe with powdered pectin instead of apples and oranges because I’ve gotten the most consistently jammy texture. While most times, if my jam doesn’t set, I just smile and call it syrup, but for these thumbprint cookies, a syrup won’t do.
- Rinse your rosehips and trim off all stems and leaves.
- Put rosehips in a stainless steel pot, preferably with a heavy bottom, and simmer until hips are soft—about 30 minutes.
- Run the softened hips, first, through a food mill or strainer and then again through a fine sieve. This part is rather tedious but necessary to get the seeds and fine hairs out that would otherwise be very irritating to the eater.
- Return your liquid to a pot and add the sugar, pectin, and lemon juice. Stir to combine.
- Bring this mixture to a rapid boil and then lower slightly to set at a high simmer for roughly 45 minutes, but check every 15 minutes or so to stir, skim foam, and adjust the heat so as not to scald the bottom.
- After 35 minutes, start checking the temperature with a candy thermometer or a digital read thermometer—you want to reach 220°F for jam.
- When you reach 220°F, pour your hot jam, through a funnel, into a sterilized jar, leaving about ½-inch headspace. If you’re going to use it soon, you can just let it cool and pop it into the fridge. For long-term storage, you can water bath can for 10 minutes.
Thumbprint Cookies
- Preheat oven to 350°F and line two baking sheets with parchment (parchment optional, just nice for jam spills.)
- Whisk together flour and baking powder in a medium bowl.
- In a small bowl, whisk together egg and vanilla or almond extract.
- With either a stand mixer or in a large bowl with a hand mixer, cream the butter, sugar, and salt until fluffy (about 4 minutes).
- Turn the speed down a notch and add egg mixture.
- Turn the speed all the way to low and add the flour mixture slowly.
- Turn the mixer off and scrape down sides and bottom of bowl to make sure all the little bits get incorporated.
- Scoop dough by the rounded tablespoon and roll into a ball with your hands. Place no less than one inch apart on the baking sheet.
- Here’s where most people use their thumb, which I used to do, but I actually find it easier and more effective to use the bottom of the ½-teaspoon measuring spoon. Center the belly of the spoon over the center of the dough ball and push gently down into the spoon with your thumb. The edges of the cookie may crack depending on the moisture and temperate of your dough. I, personally, kind of like the cracks, especially when the jam runs down into them and sort of caramelizes. If you don’t like the cracks, work with a warm and moist dough and while you’re making the “thumbprint” with one hand, gently hold the edges of the cookie together in the other. If any cracks form, they can usually be mended by pinching.
- Spoon the jam into the thumb wells. Fill to level with the top of the cookie if you want a tidy pool of jam, or, mound it a bit for a pool that might overfloweth. The jam will often settle a bit while baking, so I lean toward overfilling, plus I love when it bubbles over the edge. You can always top off the jam after baking, too.
- Bake for 10 to 14 minutes, turning the pan halfway for evenness. 12 minutes is usually the sweet spot for me, but every oven is different. Don’t wait for any significant browning, or they’ll likely be overbaked.
- Wait for the jam to stop bubbling before you take a bite—sugar burns are the worst.
- Optionally, while still a little warm, I like to sprinkle with big flake sea salt and a pinch of fine lemon zest to add an extra punch, crunch, and zing, but they’re still brilliant without this.
- Place on a cooling rack. When completely cool, they can be stored for about a week in a cookie tin.