
Prep time
20 minutes
Cook time
20 minutes
Course
Main
Skill level
Intermediate
Season
Summer
Serves
2
“Perfect” does not mean there is only one way to make a lobster roll. “Perfect” in this case, in most cases, is a moving target, subject to one’s mood and other circumstances. I grew up in Maine eating lobster rolls every summer, made by adults afflicted by the whole suite of human moods and circumstances and I’ve noticed some things along the way—it’s hard to make a bad lobster roll, it’s easy to make a good one, and it’s just as easy to make a great one, with only a little more care.
Let me save you the time and money figuring out which parts to care about. If you’re in New England, a lobster roll is almost as easy to find as gas station pizza, but also comes with the same risk as gas station pizza: it might not be so great. Admittedly, not a huge risk, but steeper with a lobster roll because they’re notoriously pricey. I’m all for supporting local restaurants, but as someone on a tight budget, this is a risk I can’t always afford to take, so I go to the dock or fish market and support my local lobstermen a few times a year by making mine at home.
This comes with some nice perks—I get to make the roll exactly the way I’m craving. I get to use the little legs to makelobster fra diavolothe next day once I’ve digested my rolls, I get to use the shells to make stock to put in the freezer for winter bisque or paella and most importantly, I can afford to buy enough lobsters to make two lobster rolls at home versus buying one from a restaurant. Trust me, one is not enough.
Ingredients
- 4 lobsters, (1½ lbs. each)
- 2 tbsp. mayonnaise
- ½ cup finely chopped celery (optional)
- 4 tbsp. butter
- 4 top-split hot dog buns
- 2 tbsp. finely minced chives or scallions (optional)
- Lemon wedges (optional)
- Salt and pepper to taste
Special equipment
Preparation
- Find fresh, live, andlivelylobsters. When you or the fishmonger lifts them from the tank, you want to see the tail and legs flex and flap—if the lobster is limp or sluggish, politely ask for another. If you’re not in a region where they carry lobsters at the market, many fish markets in New England willship overnight. I like to buy my lobster the day before I want to make the rolls and purchase one extra lobster per person, cook all the lobster that night—everyone gets one steamed lobster for dinner and the rest go in the fridge to chill to pick the next day. Don’t be lured into thinking that bigger is better when buying your lobsters. While there is more meat in a larger lobster, it tends to be noticeably tougher, less sweet and harder to remove from the shell. I’ve found that the 1 ½-pound soft-shell lobsters are the sweet spot for flavor, meat yield, and ease of access. Tip your lobstermen and your fishmonger—it’s hard and thankless work. If you’re not going to cook your lobsters the day you get them home, they’ll keep for a day in the fridge or a cooler with damp newspaper or seaweed and oxygen.
- When you’re ready to cook, set 1 to 2 inches of water on high to boil in your stock pot, place your steaming insert inside, and put on the lid. I prefer steaming to boiling because the meat retains more flavor and, presumably, nutrition. Now, you are at an ethical impasse as to how to dispatch the lobster. Your choices are either, bring the water to a rapid boil and set the lobsters, live, into the steamer, and replace the lid, which will kill them in about 15 seconds or, place each lobster on a cutting board and with the tip of a large chef’s knife, chop the head in half, pressing from the seam in the carapace right behind the head and all the way down between the eyes, thus bisecting the brain and killing them instantly. For the latter, you’ll want to put a few paper towels under your cutting board to catch the liquid. For either method, remove the rubber bands before steaming and make sure the lid is on the pot tightly. Set your timer for 11 minutes (for 1½-pound lobsters).
- Lift your steamer basket out and set it in the sink to cool. (If you purchased extra to eat the night before, eat those now, hot.) Once your lobsters have cooled a bit, you can put them in the fridge to chill overnight, or, if making rolls the same day, get to cracking. Whenever you’re ready for shelling, wear an apron or a shirt you don’t care too much for. I like to place a colander inside a large mixing bowl to pile my shells in and drain while I pick my meat into a separate mixing bowl. When the shells have drained, place in a ziploc bag in the fridge to make stock later.
- Once all of your meat is picked, tear or roughly chop it into bite-sized pieces (I prefer tearing, though this may be purely aesthetic), leaving the claws whole. This is a great time to pull the chef card and sample a bite or two in all its undressed succulence.
- Finely chop your celery and add to the bowl.
- Mix in your mayonnaise and salt and pepper to taste and put in the fridge.
- Preheat a cast iron skillet to medium/low, low enough where the butter won’t burn, but brown.
- Put 1 tablespoon of butter in the heated skillet and swirl to coat the pan.
- Place two of your top-split buns on their sides in the skillet and press lightly. Top-split is one of the things you should care about. As opposed to side-split, the top-split gives an ample side to griddle and stands upright to keep the valuable morsels of meat where you put them rather than spilling out onto the table or heaven forbid, the floor.
- Griddle for 2 to 3 minutes or until golden brown and lightly crispy. Set the buns on a plate while you add another tablespoon of butter and repeat to griddle the other side of the buns.
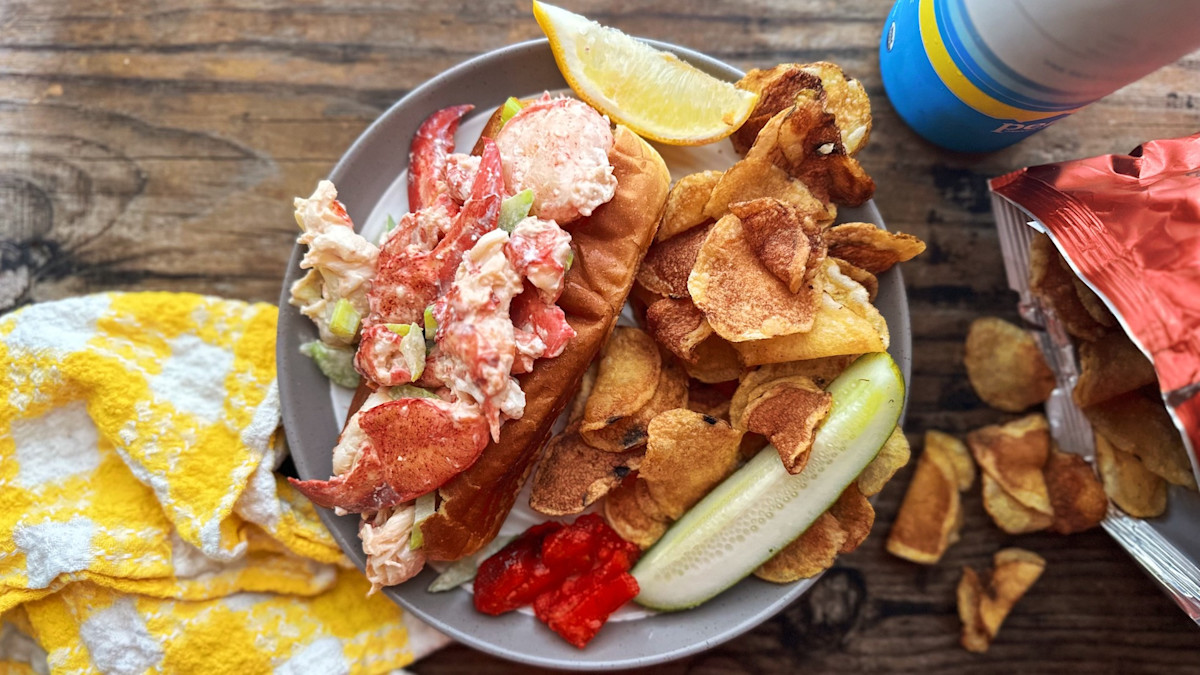
- Fill the two warm, toasted buns with the chilled lobster meat and serve immediately with a dill pickle, potato chips, and a lemon wedge. A light sprinkle of finely minced chives or scallions is welcome, depending on your mood, but really, this is about the lobster. If you want to get creative, do it with the sides—french fries, coleslaw, a salad, or corn on the cob are all great—just don’t mess with the lobster.
- The remaining butter is for toasting the remaining two buns, whenever you’re ready for another round.
Shop
Sign In or Create a Free Account
Related
Recipes
Spiny Lobster with Coconut Grits
(1)
Recipes
How To Cook The Perfect Duck Breast
(5)
Recipes
How to Make the Perfect Poke Bowl
(0)
Reviews
How to Make the Perfect Maine Lobster Roll
Prep time
20 minutes
Cook time
20 minutes
Course
Main
Skill level
Intermediate
Season
Summer
Serves
2
“Perfect” does not mean there is only one way to make a lobster roll. “Perfect” in this case, in most cases, is a moving target, subject to one’s mood and other circumstances. I grew up in Maine eating lobster rolls every summer, made by adults afflicted by the whole suite of human moods and circumstances and I’ve noticed some things along the way—it’s hard to make a bad lobster roll, it’s easy to make a good one, and it’s just as easy to make a great one, with only a little more care.
Let me save you the time and money figuring out which parts to care about. If you’re in New England, a lobster roll is almost as easy to find as gas station pizza, but also comes with the same risk as gas station pizza: it might not be so great. Admittedly, not a huge risk, but steeper with a lobster roll because they’re notoriously pricey. I’m all for supporting local restaurants, but as someone on a tight budget, this is a risk I can’t always afford to take, so I go to the dock or fish market and support my local lobstermen a few times a year by making mine at home.
This comes with some nice perks—I get to make the roll exactly the way I’m craving. I get to use the little legs to makelobster fra diavolothe next day once I’ve digested my rolls, I get to use the shells to make stock to put in the freezer for winter bisque or paella and most importantly, I can afford to buy enough lobsters to make two lobster rolls at home versus buying one from a restaurant. Trust me, one is not enough.
Ingredients
- 4 lobsters, (1½ lbs. each)
- 2 tbsp. mayonnaise
- ½ cup finely chopped celery (optional)
- 4 tbsp. butter
- 4 top-split hot dog buns
- 2 tbsp. finely minced chives or scallions (optional)
- Lemon wedges (optional)
- Salt and pepper to taste
Special equipment
Preparation
- Find fresh, live, andlivelylobsters. When you or the fishmonger lifts them from the tank, you want to see the tail and legs flex and flap—if the lobster is limp or sluggish, politely ask for another. If you’re not in a region where they carry lobsters at the market, many fish markets in New England willship overnight. I like to buy my lobster the day before I want to make the rolls and purchase one extra lobster per person, cook all the lobster that night—everyone gets one steamed lobster for dinner and the rest go in the fridge to chill to pick the next day. Don’t be lured into thinking that bigger is better when buying your lobsters. While there is more meat in a larger lobster, it tends to be noticeably tougher, less sweet and harder to remove from the shell. I’ve found that the 1 ½-pound soft-shell lobsters are the sweet spot for flavor, meat yield, and ease of access. Tip your lobstermen and your fishmonger—it’s hard and thankless work. If you’re not going to cook your lobsters the day you get them home, they’ll keep for a day in the fridge or a cooler with damp newspaper or seaweed and oxygen.
- When you’re ready to cook, set 1 to 2 inches of water on high to boil in your stock pot, place your steaming insert inside, and put on the lid. I prefer steaming to boiling because the meat retains more flavor and, presumably, nutrition. Now, you are at an ethical impasse as to how to dispatch the lobster. Your choices are either, bring the water to a rapid boil and set the lobsters, live, into the steamer, and replace the lid, which will kill them in about 15 seconds or, place each lobster on a cutting board and with the tip of a large chef’s knife, chop the head in half, pressing from the seam in the carapace right behind the head and all the way down between the eyes, thus bisecting the brain and killing them instantly. For the latter, you’ll want to put a few paper towels under your cutting board to catch the liquid. For either method, remove the rubber bands before steaming and make sure the lid is on the pot tightly. Set your timer for 11 minutes (for 1½-pound lobsters).
- Lift your steamer basket out and set it in the sink to cool. (If you purchased extra to eat the night before, eat those now, hot.) Once your lobsters have cooled a bit, you can put them in the fridge to chill overnight, or, if making rolls the same day, get to cracking. Whenever you’re ready for shelling, wear an apron or a shirt you don’t care too much for. I like to place a colander inside a large mixing bowl to pile my shells in and drain while I pick my meat into a separate mixing bowl. When the shells have drained, place in a ziploc bag in the fridge to make stock later.
- Once all of your meat is picked, tear or roughly chop it into bite-sized pieces (I prefer tearing, though this may be purely aesthetic), leaving the claws whole. This is a great time to pull the chef card and sample a bite or two in all its undressed succulence.
- Finely chop your celery and add to the bowl.
- Mix in your mayonnaise and salt and pepper to taste and put in the fridge.
- Preheat a cast iron skillet to medium/low, low enough where the butter won’t burn, but brown.
- Put 1 tablespoon of butter in the heated skillet and swirl to coat the pan.
- Place two of your top-split buns on their sides in the skillet and press lightly. Top-split is one of the things you should care about. As opposed to side-split, the top-split gives an ample side to griddle and stands upright to keep the valuable morsels of meat where you put them rather than spilling out onto the table or heaven forbid, the floor.
- Griddle for 2 to 3 minutes or until golden brown and lightly crispy. Set the buns on a plate while you add another tablespoon of butter and repeat to griddle the other side of the buns.
- Fill the two warm, toasted buns with the chilled lobster meat and serve immediately with a dill pickle, potato chips, and a lemon wedge. A light sprinkle of finely minced chives or scallions is welcome, depending on your mood, but really, this is about the lobster. If you want to get creative, do it with the sides—french fries, coleslaw, a salad, or corn on the cob are all great—just don’t mess with the lobster.
- The remaining butter is for toasting the remaining two buns, whenever you’re ready for another round.