

Cook time
-
Course
Drinks
Skill level
Advanced
There’s a certain kind of joy that belongs entirely to the springtime. I love the season and all it brings with it—morels popping,turkeys hammering, andtrout finally looking up again. Spring is a thing to be celebrated, and when I celebrate, I like to have a drink.
A fishing guide buddy introduced me to dandelion wine some years ago, and making a few gallons of this golden tonic has been a springtime tradition ever since. I’m certainly not alone in this ritual; folks have been homebrewing dandelion wine for hundreds of years. It’s delicious, easy to make, and packs a punch. Here’s how to get in on the tradition yourself.
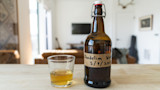
What is Dandelion Wine?Dandelion wine is a country wine brewed with a combination of citrus fruit, raisins, sugar, water, yeast, and, of course, dandelions. It’s floral, slightly sweet, and pours as clear and golden as honey.
A common misconception surrounding dandelion wine is the role of the dandelions themselves. Technically, dandelions only flavor what is essentially a raisin/citrus country wine, as the flowers don’t have any fermentable sugars to create alcohol.
Technicalities be damned, the dandelions impart a singular, complex, and deeply herbal flavor to a wine you’ll find yourself hoarding right alongsidemorelsand backstraps.
Harvesting and Processing the DandelionsBefore harvesting, be sure that the dandelions have not been sprayed with any herbicides or pesticides. I would also avoid picking dandelions in dog parks.
Pick dandelions soon after they flower, when the petals are in peak condition. Althoughdandelion greens are certainly worthyof a forager’s attention, when harvesting for winemaking, you’re only after the flower.
After harvesting, you have to separate the petals from the sepal—the green cup at the flower’s base—because the greens will impart a bitter taste to your wine. Doing this is pretty simple: pinch the sepal, pinch the petals, pull them apart, save the petals, discard the rest.
Processing dandelions for winemaking is a pretty tedious process. A couple buddies and some beers will go a long way. Besides, the social aspect of dandelion wine is more than half the point.
The Spirit of Dandelion WineThere’s something about making a batch of wine that feels at once wholesome and a little like bootlegging. Upon consumption, it’s equally at odds with itself, landing somewhere between indulgence and sacrament.
At the risk of sentimentality, making dandelion wine is about as close as we can get to bottling those first, precious days of spring, and the equally precious memories made with friends and family. Everytime I crack a bottle, those memories are what hit me first. Then, of course, a buzz.
Ingredients
- 5 - 6 quarts dandelion petals
- 2 lemons (zest and juice)
- 4 oranges (zest and juice)
- 4 lbs. sugar
- 1 lb. honey
- 2 tsp. yeast nutrient
- 2 packetsRed Star champagne yeast
- 2 gallons water
- 1 ½ lbs. golden raisins, chopped
Brewing Equipment
- 8 quart pot
- Larger stockpot and burner
- Large colander
- Large funnel
- Cheese cloth
- Thermometer
- Measuring cups and scale
- Primarycarboyorfermenting bucket
- Secondary carboy or bucket
- 6-foot section of tubing
- Airlock
- Sealable bottles
- Sanitizer
Preparation
I’m not a professional winemaker. The following instructions are in layman’s terms, which I believe is more in the spirit of a country wine anyhow.
- In your kitchen, put the dandelion petals in a large pot and add enough water to cover them, plus a few cups. Gently simmer for 10 to 20 minutes, take off heat, and let the mixture sit out for a day or two, covered with lid, stirring every now and then.
- Set up your stockpot and burner outside. Line a colander with the cheesecloth and position it over your stockpot. Pour the dandelion mixture into the colander, straining it into the stockpot. Wring the cheesecloth to release all liquid from dandelions. Discard dandelions.
- Add citrus zest and water until there’s about a gallon and a half of liquid in your pot. Bring to a rolling boil. Boil for ten minutes, then add citrus juices and boil for an additional 5 minutes. Cover and allow to cool for about half an hour.
- At this point, everything coming in contact with the winemust be sanitized. Follow the instructions on your sanitizer and sanitize all equipment, excluding the cheesecloth. While it’s surprisingly hard to hurt yourself making homemade wine, a contaminated or infected wine will either turn to vinegar or render itself undrinkable.
- Per the instructions on your sanitizer, sanitize the funnel, line it with cheesecloth, then use it to pour the warm liquid from your stockpot into your carboy, straining out zest. Remove cheesecloth and strained zest from the funnel. Use the funnel to add sugar, honey, and yeast nutrient to the liquid.
- If using a brewing bucket, stir the mixture until the sugar, honey, and yeast nutrient dissolve into the liquid. If using a carboy, take the carboy by its neck and bottom and swirl the still-warm mixture around until sugar, honey, and yeast nutrient dissolve.
- Top off with water until the carboy or bucket contains about 2 gallons of liquid. Allow to cool to around 90°F. Add 2 packets of champagne yeast, avoiding the sides of the carboy as you pour.
- Cap with the airlockand store in a dark place at room temperature (a closet works well). Allow your mixture to ferment. You should see plenty of activity in the next day or two. Check back frequently to make sure everything is under control. Resist the temptation to remove the airlock.
- When active fermentation ceases and the airlock stops bubbling (approximately 1 to 3 weeks), add the chopped raisins. Replace the airlock. Wait 2 to 3 months.
- While being careful not disturb the sediments on the bottom,syphon or “rack” the wineinto another (secondary) sterilized container or carboy. Cap with airlock and allow to age for 2 to 3 more months.
- At this point, I degas the wine. Degassing is a process that removes suspended carbon dioxide, and many folks consider it an “extra” step. If you’re interested, you can read more about ithere. If you choose to degas your wine, allow it to settle for another couple weeks before bottling.
- Sanitize bottles and tubing then bottle the wine. This process is no different than racking the wine, except instead of transferring from one container to another you’re transferring to bottles. When bottling, leave roughly 1 ½ inches of air between the wine and the cork or cap.
- Age to your liking. Even a few weeks in a cool, dark place can do wonders for dandelion wine, so don’t be afraid to let some of it mature awhile. Drink as desired.
Shop
Sign In or Create a Free Account
Related
Recipes
Pheasant in White Wine Sauce
(2)
Recipes
Bottle of White Wine Braised Venison
(1)
Recipes
Dandelion Wine
(0)Reviews
Dandelion Wine
Cook time
-
Course
Drinks
Skill level
Advanced
There’s a certain kind of joy that belongs entirely to the springtime. I love the season and all it brings with it—morels popping,turkeys hammering, andtrout finally looking up again. Spring is a thing to be celebrated, and when I celebrate, I like to have a drink.
A fishing guide buddy introduced me to dandelion wine some years ago, and making a few gallons of this golden tonic has been a springtime tradition ever since. I’m certainly not alone in this ritual; folks have been homebrewing dandelion wine for hundreds of years. It’s delicious, easy to make, and packs a punch. Here’s how to get in on the tradition yourself.
What is Dandelion Wine?Dandelion wine is a country wine brewed with a combination of citrus fruit, raisins, sugar, water, yeast, and, of course, dandelions. It’s floral, slightly sweet, and pours as clear and golden as honey.
A common misconception surrounding dandelion wine is the role of the dandelions themselves. Technically, dandelions only flavor what is essentially a raisin/citrus country wine, as the flowers don’t have any fermentable sugars to create alcohol.
Technicalities be damned, the dandelions impart a singular, complex, and deeply herbal flavor to a wine you’ll find yourself hoarding right alongsidemorelsand backstraps.
Harvesting and Processing the DandelionsBefore harvesting, be sure that the dandelions have not been sprayed with any herbicides or pesticides. I would also avoid picking dandelions in dog parks.
Pick dandelions soon after they flower, when the petals are in peak condition. Althoughdandelion greens are certainly worthyof a forager’s attention, when harvesting for winemaking, you’re only after the flower.
After harvesting, you have to separate the petals from the sepal—the green cup at the flower’s base—because the greens will impart a bitter taste to your wine. Doing this is pretty simple: pinch the sepal, pinch the petals, pull them apart, save the petals, discard the rest.
Processing dandelions for winemaking is a pretty tedious process. A couple buddies and some beers will go a long way. Besides, the social aspect of dandelion wine is more than half the point.
The Spirit of Dandelion WineThere’s something about making a batch of wine that feels at once wholesome and a little like bootlegging. Upon consumption, it’s equally at odds with itself, landing somewhere between indulgence and sacrament.
At the risk of sentimentality, making dandelion wine is about as close as we can get to bottling those first, precious days of spring, and the equally precious memories made with friends and family. Everytime I crack a bottle, those memories are what hit me first. Then, of course, a buzz.
Ingredients
- 5 - 6 quarts dandelion petals
- 2 lemons (zest and juice)
- 4 oranges (zest and juice)
- 4 lbs. sugar
- 1 lb. honey
- 2 tsp. yeast nutrient
- 2 packetsRed Star champagne yeast
- 2 gallons water
- 1 ½ lbs. golden raisins, chopped
Brewing Equipment
- 8 quart pot
- Larger stockpot and burner
- Large colander
- Large funnel
- Cheese cloth
- Thermometer
- Measuring cups and scale
- Primarycarboyorfermenting bucket
- Secondary carboy or bucket
- 6-foot section of tubing
- Airlock
- Sealable bottles
- Sanitizer
Preparation
I’m not a professional winemaker. The following instructions are in layman’s terms, which I believe is more in the spirit of a country wine anyhow.
- In your kitchen, put the dandelion petals in a large pot and add enough water to cover them, plus a few cups. Gently simmer for 10 to 20 minutes, take off heat, and let the mixture sit out for a day or two, covered with lid, stirring every now and then.
- Set up your stockpot and burner outside. Line a colander with the cheesecloth and position it over your stockpot. Pour the dandelion mixture into the colander, straining it into the stockpot. Wring the cheesecloth to release all liquid from dandelions. Discard dandelions.
- Add citrus zest and water until there’s about a gallon and a half of liquid in your pot. Bring to a rolling boil. Boil for ten minutes, then add citrus juices and boil for an additional 5 minutes. Cover and allow to cool for about half an hour.
- At this point, everything coming in contact with the winemust be sanitized. Follow the instructions on your sanitizer and sanitize all equipment, excluding the cheesecloth. While it’s surprisingly hard to hurt yourself making homemade wine, a contaminated or infected wine will either turn to vinegar or render itself undrinkable.
- Per the instructions on your sanitizer, sanitize the funnel, line it with cheesecloth, then use it to pour the warm liquid from your stockpot into your carboy, straining out zest. Remove cheesecloth and strained zest from the funnel. Use the funnel to add sugar, honey, and yeast nutrient to the liquid.
- If using a brewing bucket, stir the mixture until the sugar, honey, and yeast nutrient dissolve into the liquid. If using a carboy, take the carboy by its neck and bottom and swirl the still-warm mixture around until sugar, honey, and yeast nutrient dissolve.
- Top off with water until the carboy or bucket contains about 2 gallons of liquid. Allow to cool to around 90°F. Add 2 packets of champagne yeast, avoiding the sides of the carboy as you pour.
- Cap with the airlockand store in a dark place at room temperature (a closet works well). Allow your mixture to ferment. You should see plenty of activity in the next day or two. Check back frequently to make sure everything is under control. Resist the temptation to remove the airlock.
- When active fermentation ceases and the airlock stops bubbling (approximately 1 to 3 weeks), add the chopped raisins. Replace the airlock. Wait 2 to 3 months.
- While being careful not disturb the sediments on the bottom,syphon or “rack” the wineinto another (secondary) sterilized container or carboy. Cap with airlock and allow to age for 2 to 3 more months.
- At this point, I degas the wine. Degassing is a process that removes suspended carbon dioxide, and many folks consider it an “extra” step. If you’re interested, you can read more about ithere. If you choose to degas your wine, allow it to settle for another couple weeks before bottling.
- Sanitize bottles and tubing then bottle the wine. This process is no different than racking the wine, except instead of transferring from one container to another you’re transferring to bottles. When bottling, leave roughly 1 ½ inches of air between the wine and the cork or cap.
- Age to your liking. Even a few weeks in a cool, dark place can do wonders for dandelion wine, so don’t be afraid to let some of it mature awhile. Drink as desired.