Plant Propagation: Get More Plants Without Buying Seeds


Let’s be honest: a lot of people interested in homesteading have some version of a plant problem. And by plant problem, I mean, we love plants. What could be better than to grow more plants from the plants we already have?
Here are several easy, sustainable techniques to root, divide, and clone your current plants, so you can grow even more without buying seeds and hurting your wallet.
Houseplants and Herbs From Cuttings
One of the easiest ways to propagate plants without seeds, particularly many houseplants, cacti, andherbs, is by rooting them from cuttings. Rooting from a cutting is simple, easy and doesn’t require much extra equipment or time.
Certain species of plants will root better from cuttings at different times of year and growth cycle, so be sure to look up your particular plant before getting started. Regardless of species, you’ll always get a healthier cutting if you start with a healthy, well-hydrated plant. Many plants will root better from cuttings if you choose new, summer growth rather than older, woodier parts of the plant.
Once you choose your plant, make sure you have asharp knifeto make a clean cut. Find a section of new, healthy-looking growth on the plant. It’s sometimes possible to root from one leaf or segment, but generally better to choose a section of plant that’s at least several inches long and has at least two or three growth nodes. A growth node is the point along the stem where the buds, leaves, or branches originate. You’ll generally want at least one growth node to grow roots and a second where a new stem or leaves can grow.
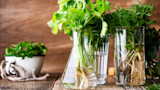
Once you’ve taken your cutting, immediately transfer it to your growth medium. If there’s much time between, you’ll want to recut the end when you plant it. You can root new cuttings in a variety of ways. You may choose to start with a soilless media. This might be a moist paper towel wrapped around the base of the plant and checked daily. Some plant cuttings like ivy and certain herbs can also root while suspended in a small glass of water.
A popular method for rooting cuttings is to fill a small pot with vermiculite, perlite, sand, peat moss, or some combination thereof, pre-moisten it, then bury the base of your cutting 1 to 2 inches deep, making sure at least one of the growth nodes on the plant is submerged. Depending on the plant, you can also bury it in equal parts potting soil and vermiculite or perlite. Regardless of your mixture, move the plant to a warm spot with indirect light and keep the medium moist. Gently check after about two weeks for root growth. If you don’t see any, give the cuttings another week or two. Once the roots begin growing, you can transplant as you wish.
If you’re looking to propagate jade plants or other succulents, you’ll want to let the cut end of the plant sit out on a piece of newspaper to dry and callus for several days before planting. This step helps prevent the stem from rotting. Once the end is dry, move it to a pot or tray of moist, sandy, porous soil. Depending on if you’re starting from a stem or single leaf, the cutting may take a few weeks to months to develop roots. Water intermittently but not frequently, and check for root growth every few weeks. Once roots begin to form, proceed as above, potting up into a generally more porous and sandy soil than other herbs and plants.
Trees and Shrubs From Cuttings
Starting trees from cuttings is a great and economical way to create shade, build habitat, make windbreaks and invest in the long-term biodiversity of your property.
Keep in mind that not every tree you take a cutting from will grow true to variety. For example, most commercially available fruit trees are grafted to an alternative rootstock, so if you take a cutting from your favorite peach tree, the fruit, vegetation, quality, and size of the mature tree resulting from your cutting may not be an exact duplicate of your favorite tree. Starting trees from cuttings generally works best with deciduous trees and woody shrubs but will not work with evergreens.
The timing for taking a cutting depends on whether you are using softwood (new, green, soft growth) or hardwood (older, woodier growth). Softwood cuttings are best taken from actively growing new growth in the mid to late spring, while hardwood cuttings are better taken in dormant periods to avoid damaging the parent plant, either early spring or winter.
For softwood cuttings, use a sharp knife to cut a growing section off the plant between 6 and 12 inches long. Be sure there are actively growing leaves on your cutting but remove any flowers or fruit. For hardwood cuttings, cut enough that you’re getting several leaf buds, again a minimum of 6 to 12 inches.
For softwood cuttings, trim the end to directly below a growth node or leaf. Then, working your way up the plant, cut off half of every remaining leaf. This helps the plant retain moisture and focus energy into growing new roots.
With hardwood cuttings, trim the end to directly below a leaf bud. Then trim the top so that the final cutting is closer to 6 inches, making sure there are at least two to three more leaf buds on the final cutting.
With hardwood cuttings, you’ll also want to gently strip off the very top layer of bark on the end you’ll be rooting. If this involves also stripping off a leaf bud, that’s okay.
From here, you’ll follow the same methods for softwood and hardwood cuttings. First, prepare some rooting hormone. You can buy this commercially or make your own by covering pieces of willow branch in boiling water, soaking them for 48 hours, then removing the willow pieces.
Once you’ve prepared your rooting hormone, soak the end of your cutting in it, then bury the same end in a small pot with a porous growth media, as described above, being sure to bury at least one growth node. You can also use the rooting hormone to water your plant after it’s buried.
Similar to the directions with herbs and houseplants, place the pot in a warm spot with indirect light. You might cover it with a plastic bag to keep in moisture, making sure the plastic doesn’t touch the cutting.
Keep the cutting moist and gently check for roots every few weeks. Once the plant has started rooting, pot up into a larger container with soil and begin hardening off to plant outside.
Plants with Runners
Some popular homestead plants like mint andstrawberriessend out creeping stems known as runners or stolons. These runners grow out from the main stem of the parent plant and create a clone of that parent plant. While many gardeners pinch off the runners, particularly those of strawberry plants in order to concentrate the plant energy on fruit production, they can be an excellent way to propagate these plants and grow your garden.
To propagate clone plants from runners, inspect your plants in early spring and take note of when they start putting off runners. By late spring to early summer, mature plants will usually put off quite a few. You can let the runners root themselves naturally, then dig them up and move them, but sometimes they grow better (and are easier to move) if you encourage them to root in a pot instead.
To root a runner in a pot, choose the closest runners to the parent plant and move the growing end with leaves to sit with its bottom in a small pot with a combination of moist peat moss and sand. This works especially well with many varieties of strawberry plants, whose runners are always above ground.
Secure the runner and growth into the pot with a clip or stake and water well. After a few weeks, begin gently checking for root growth. Once the roots have taken in the soil, clip the runner and attach the new growth to the parent plant and replant your new strawberry wherever you like.
To use this method with mint, the runners of which often grow below ground, locate the new growth that’s most obviously an offshoot from the parent plant and watch its progress. Once the plant seems well established, cut several inches around the new growth, remove the whole root ball into a new pot, and transplant to your desired location.
Dividing Root Balls
Though most plants have some version of a root ball, some plants such as rhubarb and asparagus, after they become mature, have hardy root systems and are more amenable than others to getting split up or divided at their roots. For some plants such as rhubarb, dividing their roots every few years is actually beneficial in helping them stay healthy and productive.
If you’re looking to split a plant by its root ball, it’s best to wait until early spring when the plant is still dormant. Water well the day before to help protect the roots as you dig and divide. Dig out the entire root ball, with some room to spare on all sides.
The number of sections you can split your plant into will depend on the growth stage of the plant and the plant itself. You’ll want to make sure every section you’re splitting off has enough roots and at least one viable stem, leaf or bud. The more buds you include, the larger the transplant will be.
Once the root ball is out of the ground and you’ve decided how you’ll split it, it’s time for the actual splitting. Depending on the age of the root ball, this step can be difficult. The older the plant, the woodier and harder it will be. No matter the age, find a sharp knife (or in extreme cases, ahatchet), disinfect with rubbing alcohol and allow it to dry. Do not skip this disinfection step! Your transplants will be in a fragile state and more susceptible to bacterial or fungal infections.
To split the crown, insert your blade into the section you want to split and begin sawing. Again, depending on the age of the plant, this might require some aggressive hacking. Don’t forget that plants with root balls that you can split tend to be fairly hardy, so they'll most likely bounce back. Once you get the separation going, you can also use your fingers to untangle and separate roots.
Once you divide the root ball into the desired sections, plant each section into a new pot with well-draining, fertile soil. You can also transplant directly into the ground. Be sure to water immediately and well, and water daily for the next few weeks as your new plants get established.
Enjoy your plant propagation. And remember—different techniques work best for different plants, so be sure to look up your specific varieties to choose which method is best for you.
Shop
Sign In or Create a Free Account
Related
Homesteading
Plant Propagation: Get More Plants Without Buying Seeds
Gardening
How to Get Rid of Squash Vine Borers without Pesticides