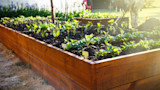
How to Prepare Your Garden Beds for Spring


Spring is here again in the Northern Hemisphere. For us vegetable gardeners, that means a big sigh of relief followed by a frenzy of activity preparing the garden for the upcoming growing season. Spring garden prep activities range from the practical, like pulling up hardy winter weeds, to the somewhat supernatural, like burying a cow skull filled with oak bark, a commonal practice onbiodynamic farms. Rituals aside, here are some practical tips for getting your vegetable garden ready to feed you and yours for the year to come.
Preparing the SoilThe amount of preparation your garden beds need in the spring depends on how you left them at the end of the previous growing season. Beds that were amended withcompostor fertilizer in the fall and then mulched orcover-croppedwill need little work to be ready to plant.
But if you’re like most of us, your garden might look more like a graveyard of last year’s tomato vines or an unintentional nursery for early spring weeds. And that’s OK! No matter what your garden looks like now, the end result you’re aiming for when preparing your soil is a weed-free, uncompacted, loose seedbed. This type of soil is commonly referred to as “tilthy,” and there are several ways of achieving it.
TillingThe most common way gardeners prepare their beds for planting is through tilling. A rototiller’s metal tines churn through the soil, breaking up compacted soil and burying grass, weeds, or cover crops to leave a bed clear and ready for planting. It is an excellent way to prepare beds quickly, especially when breaking ground on a new garden covered in sod or deep-rooted plants. However, the convenience of mechanical tillage is not without its drawbacks.
Using a tiller inverts the soil layers in your garden, disrupting the ecology of the soil. That means all of the worms, microbes, and other organisms that live in the soil and create fertility for your plants are given a major setback and will need time to recover. Tilling also changes your soil structure. While it is fluffy and loose in the short term, the looser soil is more susceptible to erosion and runoff from heavy rain events or compaction from being stepped on. In heavy clay soils, repeated tilling can cause a “hardpan” to form beneath the depth of the tiller blades, restricting the growth of deep-rooted plants.
Double DiggingFor those working on a smaller scale without a tiller, you can use a process called “double digging” to work in compost and amendments and prepare a deep, fluffy bed of soil for planting. In this method, you use a shovel to remove the top layer of soil by digging a trench about 8 to 10 inches deep along the length of your garden bed and putting the soil to the side of the trench or into a wheelbarrow.
Next, loosen the soil at the bottom of the trench by inserting the shovel or a pitchfork about 8 to 10 inches and rocking it back and forth. Now add back the soil that was taken off the top, incorporating compost and amendments if desired. Repeat for the entirety of your garden bed. This process, while labor-intensive, creates very tilthy soil and allows plant roots to access nutrients deep in the soil. While it is less destructive to soil biology than tilling, it still causes a lot of soil disturbance and turns over dormant weed seeds which will sprout when they reach the surface.
No-DigIf you’d like to avoid the labor, machinery, and potential weed proliferation of the first two types of bed preparation, “no-dig” gardening might be for you. There are a number of ways to go about this method, but the main principle is to avoid disturbing the soil as much as possible. Keeping the soil structure intact promotes soil biota and beneficial fungi that add soil fertility, retain moisture, and prevent compaction and erosion. Weed seeds also stay deep in the soil where they can’t germinate, so the only weeds in your garden will come from perennials or seeds blown onto your soil surface during the growing season.
To prepare your bed for planting, you can put a thick layer of compost on top of your bed to smother small weeds and create a loose medium for seeds and plant roots to grow in. Many gardeners put down cardboard first to provide an additional barrier for grass or weeds. The cardboard will break down quickly in the moist environment, allowing your crops’ roots to grow. This is our preferred bed preparation method, but it does require a lot of compost, which can be expensive for large gardens.
Soil TestingIf it's yourfirst season growingin a certain location, getting a soil test to understand your baseline pH and nutrient levels can be beneficial. You can buy kits at most big box garden centers to do it yourself, but the results can be inconclusive or hard to read. I recommend sending your soil off to a lab to have it done professionally. Many of these analyses will alsotest your soil for leadcontamination which can be very important if you grow food in an urban garden.
Beyond just giving you the levels of nutrients in your soil, the test results also include recommendations for how much of each nutrient to add to bring your soil into proper balance for growing vegetables. Many agricultural universities offer very affordable soil testing services and will provide all of the instructions you need to collect and submit a suitable soil sample from your garden.
FertilizationIf you choose not to test the nutrient levels in your soil, your best bet for ensuring that your garden has adequate nutrient levels is to incorporate healthy compost or slow-release organic fertilizer in your garden beds. When you’re choosing a fertilizer, look for three numbers separated by dashes on the bag and choose one where they are relatively equal (i.e., 5-5-5 or 10-10-10). Those numbers specify the amount of nitrogen, phosphorus, and potassium in the mix. Choosing one with a healthy blend of all three will ensure that your garden is not missing any critical nutrients.
People are sometimes worried about “burning” their plants with fertilizer, but that is generally only an issue when using a very nitrogen-heavy synthetic fertilizer or fresh, uncomposted manure. Cover crops are another excellent way to add nutrients and organic matter to your soil, but they need to be planted the previous fall to have any impact on your spring garden.
It often feels overwhelming to transition from the dormancy of winter to the frenzy of spring activity, but you’ll thank yourself for the work you put in now when you’re eating fresh vegetables from your garden in June. Happy gardening!
Shop


Sign In or Create a Free Account
Related
Gardening
How to Choose the Best Spot for a Vegetable Garden

Gardening
3 Steps to Winterize Your Garden
