Photos: How to Build a Raised Garden Bed from a Plastic Barrel

There is no better complement to a meal of wild game than fresh herbs and veggies from your own garden. Our hillside home in East Tennessee isn’t very conducive to traditional gardening, so I build raised beds as a practical, productive solution. I use plastic barrels to make beds that require little weeding, watering, and maintenance to keep our plants healthy. This style of gardening also gets the work up off the ground, which makes tending to it easier on your back.
Well-drained garden soil is crucial for healthy plants. To avoid problems like root rot and other moisture-related issues, I drill drainage holes in the bottom of the barrel, then line it with coarse gravel to ensure proper drainage and to keep the soil from falling through the holes.
It’s important to solidify your garden bed location before beginning construction. I selected a few locations on our deck where the most sunlight penetrates the tree canopy. Although none of the components going into the project are too heavy on their own, the assembled bed with soil will weigh about 75 pounds total, so you won't want to move it around too much after it's completed.
Here are 10 simple steps to build your own raised bed from a plastic barrel.

1. Procure Materials and Tools
- 40 gallon barrel*
- 3 10-foot, pressure-treated 2x4 boards**
- 1-pound box of 3-inch exterior grade screws
- 1-pound box of 1.5-inch exterior grade screws
- Non-toxic paint
- Bag of coarse gravel
- Large bag of organic raised bed soil
- Tools: screw gun, reciprocating saw, tape measure, ⅜-inch or similar spade bit, chalk line, speed square, Sharpie marker
Notes: *Finding a barrel that was food-grade in its previous life is crucial because some of these barrels held pesticides, herbicides, and other liquids you don't want near your veggies. Check your local Facebook Marketplace for listings. **To save money, you could buy one 2x10-inch board and rip cut it into three.

2. Cutting the BarrelWith the barrel standing upright, you’ll see the molding line dividing the barrel into equal halves. You should mark and cut the barrel perpendicular to this molding line to avoid cutting through the barrel caps.
Start by measuring to the center of the barrel and making a mark, then use a square to scribe a line outward toward the edge of the barrel. Next, flip the barrel over and repeat on the other end. Join these two lines together on both sides using a straight edge (lumber works too). Once your line is marked all the way around the barrel, grab the reciprocating saw and get to work. It's important to keep this cut as centered as possible so that when you go to mount the barrel to the frame, the cut edge of the barrel sits nice and flush.

3. Wash and Paint BarrelFill a bucket with hot water and dish soap. Use a rag to scrub the barrel inside and out. Don’t skip this step. Regardless of what the barrel contained in its previous life, play it safe and give it a good scrub.
Once the barrel is dry, lay it down and paint the outside. Be sure to use non-toxic paint because you are going to eat what is grown in this barrel. Painting the outside is an unnecessary step, but will vastly improve the aesthetic of the final product. For this specific bed, I used a flat chestnut color which gives the plastic barrel an aged copper look from a distance.

4. Build Frame and Attach BarrelFirst measure the length and width of the barrel. Cut the shorter side pieces and add ¼ inch to assure the frame doesn’t end up too tight. For the longer pieces of the frame, take the length measurement of the barrel and add 3¼ inches so they will overlap the shorter pieces without being too tight.
You've made your cuts, lay out the lumber and fasten through the long pieces into the shorter pieces using two 3-inch screws at all joints.
With the freshly-painted barrel lying face down, set the frame over top of it and push it down flush with the cut edge of the barrel. Flip the barrel over and fasten it to the frame using 1½-inch screws every 4 inches around the interior perimeter of the barrel. Once fastened, flip it back over to the face-down position.

5. Assemble Legs and Attach to FrameDetermine a comfortable working height for your garden. I’m 6 feet tall and find that a 36-inch total height is ideal for working the soil and weeding without bending over at all. You'll toenail the legs to the frame we just attached to the barrel, so leg length is determined by subtracting the frame width (3 inches in this case) from desired bed height (36 inches) to give a leg length of 33 inches.
Cut eight pieces to 33 inches and screw pairs of together lengthwise in an “L” shape. Take care to keep the ends flush to avoid rocking table syndrome.
Set legs on each corner and screw diagonally to the frame using three 3-inch screws per leg. The barrel isn’t perfectly square, so if your legs look out of whack after attaching, don’t worry about it. We’ll address that next.

6. Attach “Kick Rail” BracingWhile the legs are still pointing up, measure 8 inches down and mark each leg on the inside. The pressure-treated 2x4s works just fine for this, but I chose to rip smaller pieces (1¼ inches) for aesthetic purposes. These will tie the legs to each other for strength and can also be used to construct a small shelf if you desire.

7. Drill Drainage Holes and Finish PaintingWithout proper drainage, your plants will suffer root rot and die. Flip the barrel upright and drill 10 holes using a ⅜-inch spade bit. Standard drill bits will melt the plastic before piercing the hole, so use a spade. Once your drainage holes are complete, move the bed to its final desired location.
Paint inside the bed and slightly above the top edge, giving the top a nice finish while keeping paint off the outside edges of the wood frame. Hit the upper few inches of the inside of the bed also, just down to where your dirt will top off.

8. Add Gravel and SoilUsing coarse gravel, line the bottom of the bed with 1 inch of rock, making sure it covers the drainage holes. The gravel will prevent the soil from washing out during rain or watering and assure properly drained soil.
Next, add a large bag of raised bed soil that will fill up to about 3 inches below the top edge of the bed. Dump, spread, and leave indentations for your new plants.

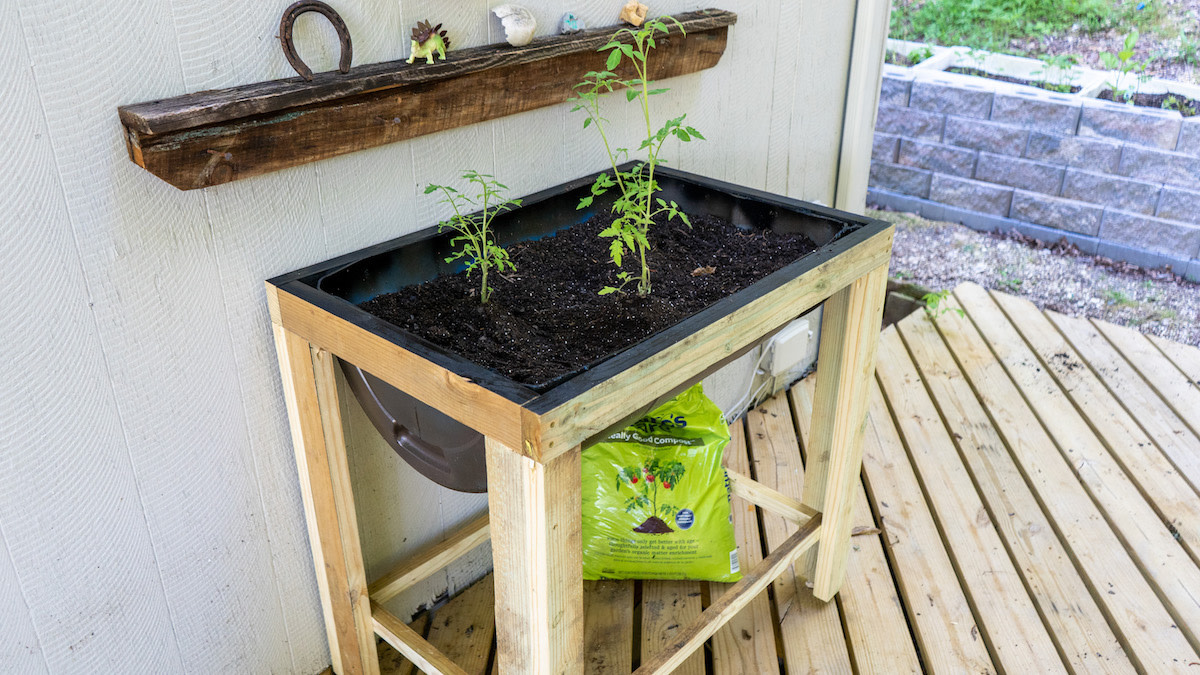
9. PlantThese beds work great for just about anything: tomatoes, squash, watermelon, eggplant, herbs, and beans are all growing in our beds with great results. Good soil will hold moisture best, requiring less watering. The drainage holes will prevent flooding if heavy rains occur. Once the plants are planted, be sure to give them a good watering.
Shop


Sign In or Create a Free Account
Related

Gardening
Video: How to Plan a Garden


Gardening
How to Plan a Sustenance Garden

