How to Choose an Archery Release

If someone takes archery and bowhunting seriously enough, invariably, they start to tinker with their equipment. What might start withupgrading to a flagship bowprogresses into an accessory deepdive, spanning everything from roving sights to stabilizers to micro-adjustable drop-away rests.
A lot of this accessorizing is rooted in common knowledge. Stabilizers keep you steady, aquality sightis a must, and drop-away rests are accepted as the gold standard. While all gear is subject to personal preference, if you look at the setups of 10 serious bow hunters, you’re going to see minor variations in more or less the same accessories.
There is one essential accessory that does vary greatly from shooter to shooter—the release they choose. For some folks, this equipment choice may begin and end with the index release someone slapped on their wrist just after handing them their first compound bow. For others, it’s an object of endless tinkering and obsession.
In this article, we’re going to break down the basics of good shot execution, the importance of back tension, trigger vs. triggerless releases, the four most common styles of release, and, ultimately, help you decide which release is right for you.
The Basics of Good Shot ExecutionFirst, we need to define good shot execution. If you talk to the vast majority of top-tier archers, they’ll tell you the same thing—a good shot is when the pin floats gently around the center of your target while you steadily and continuously activate the release until the shot breaks cleanly, taking you by surprise. This is what’s known as a “surprise release” and it’s what most archers consider ideal.
The opposite of a surprise release is what’s known as “punching the trigger.” Punching the trigger is the act of quickly activating the trigger mechanism as soon as your pin hits the center of the target, instead of applying steady pressure as the pin floats.
Punching the trigger can lead to all sorts of problems. Rather than accepting the pin float and focusing on good shot execution, archers with punching problems often try to time their shot, either dropping or raising their pin through the center of the target and slapping their trigger as soon as it gets to the X. Trying to time shots in this way can lead to anxiety, and anxiety can lead to “target panic.” Target panic is a bad time, and you can read aboutMark Kenyon’sjourney with it (as well as how he overcame it)here.
While some people believe in a “command release”—essentially a justification of habitually punching the trigger—in general, it’s considered bad form and leads many aspiring archers to a plateau in their progression, or worse, regressing astarget panictakes hold.
The Importance of Back TensionWhen discussing the ideal release, you often hear the term “back tension,” which simply refers to engaging your back throughout your shot. Not only does this muscle engagement prevent your form from collapsing, it also encourages the use of a large muscle group to help fire your release. In the case of a back tension release, back tension is the only way to fire your release, but we’ll touch more on that later.
Here’s why it works: By loading your trigger, then firing the release by pulling through with your back, you are less likely to punch the trigger. The advantage here is the large muscle group, specifically the lack of fine control you have over it—you’re just not able to move your back as quickly as your finger. This translates to less control over exactly when the shot breaks, resulting in a surprise release and better shot.
Less control equating to a better shot seems counterintuitive, but it’s been proven by the pros time and time again.
Trigger vs. Triggerless ReleasesBefore we break down the four main styles of release, we need to understand the two major subtypes of release: trigger and triggerless.
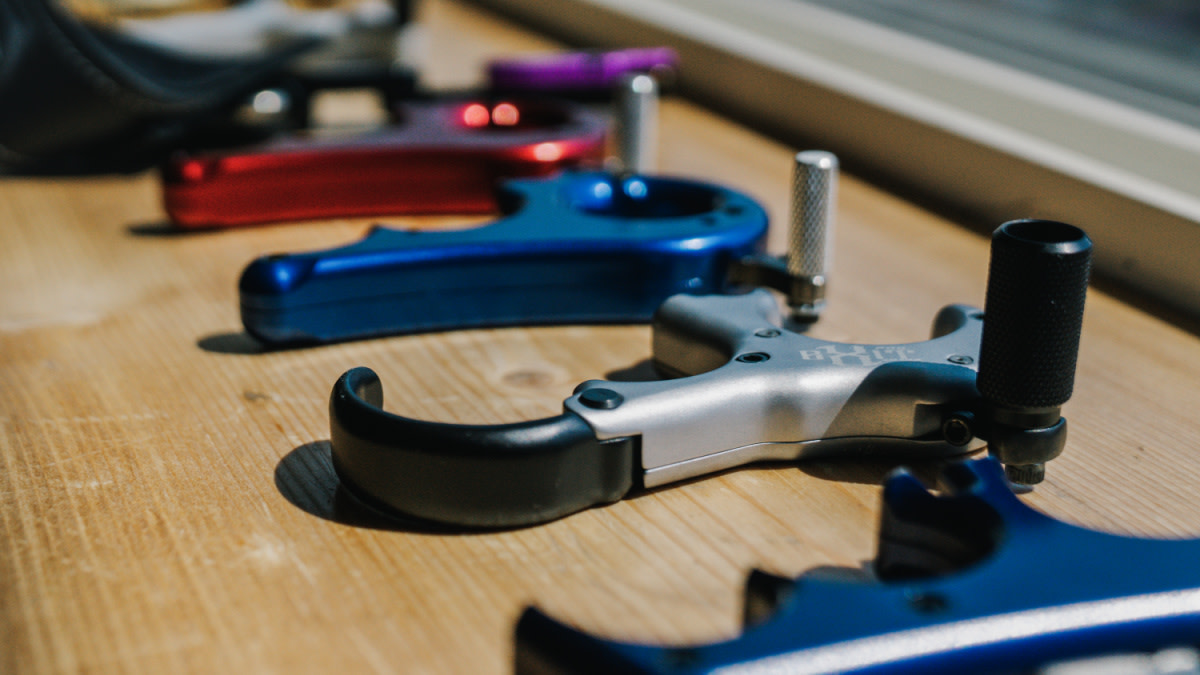
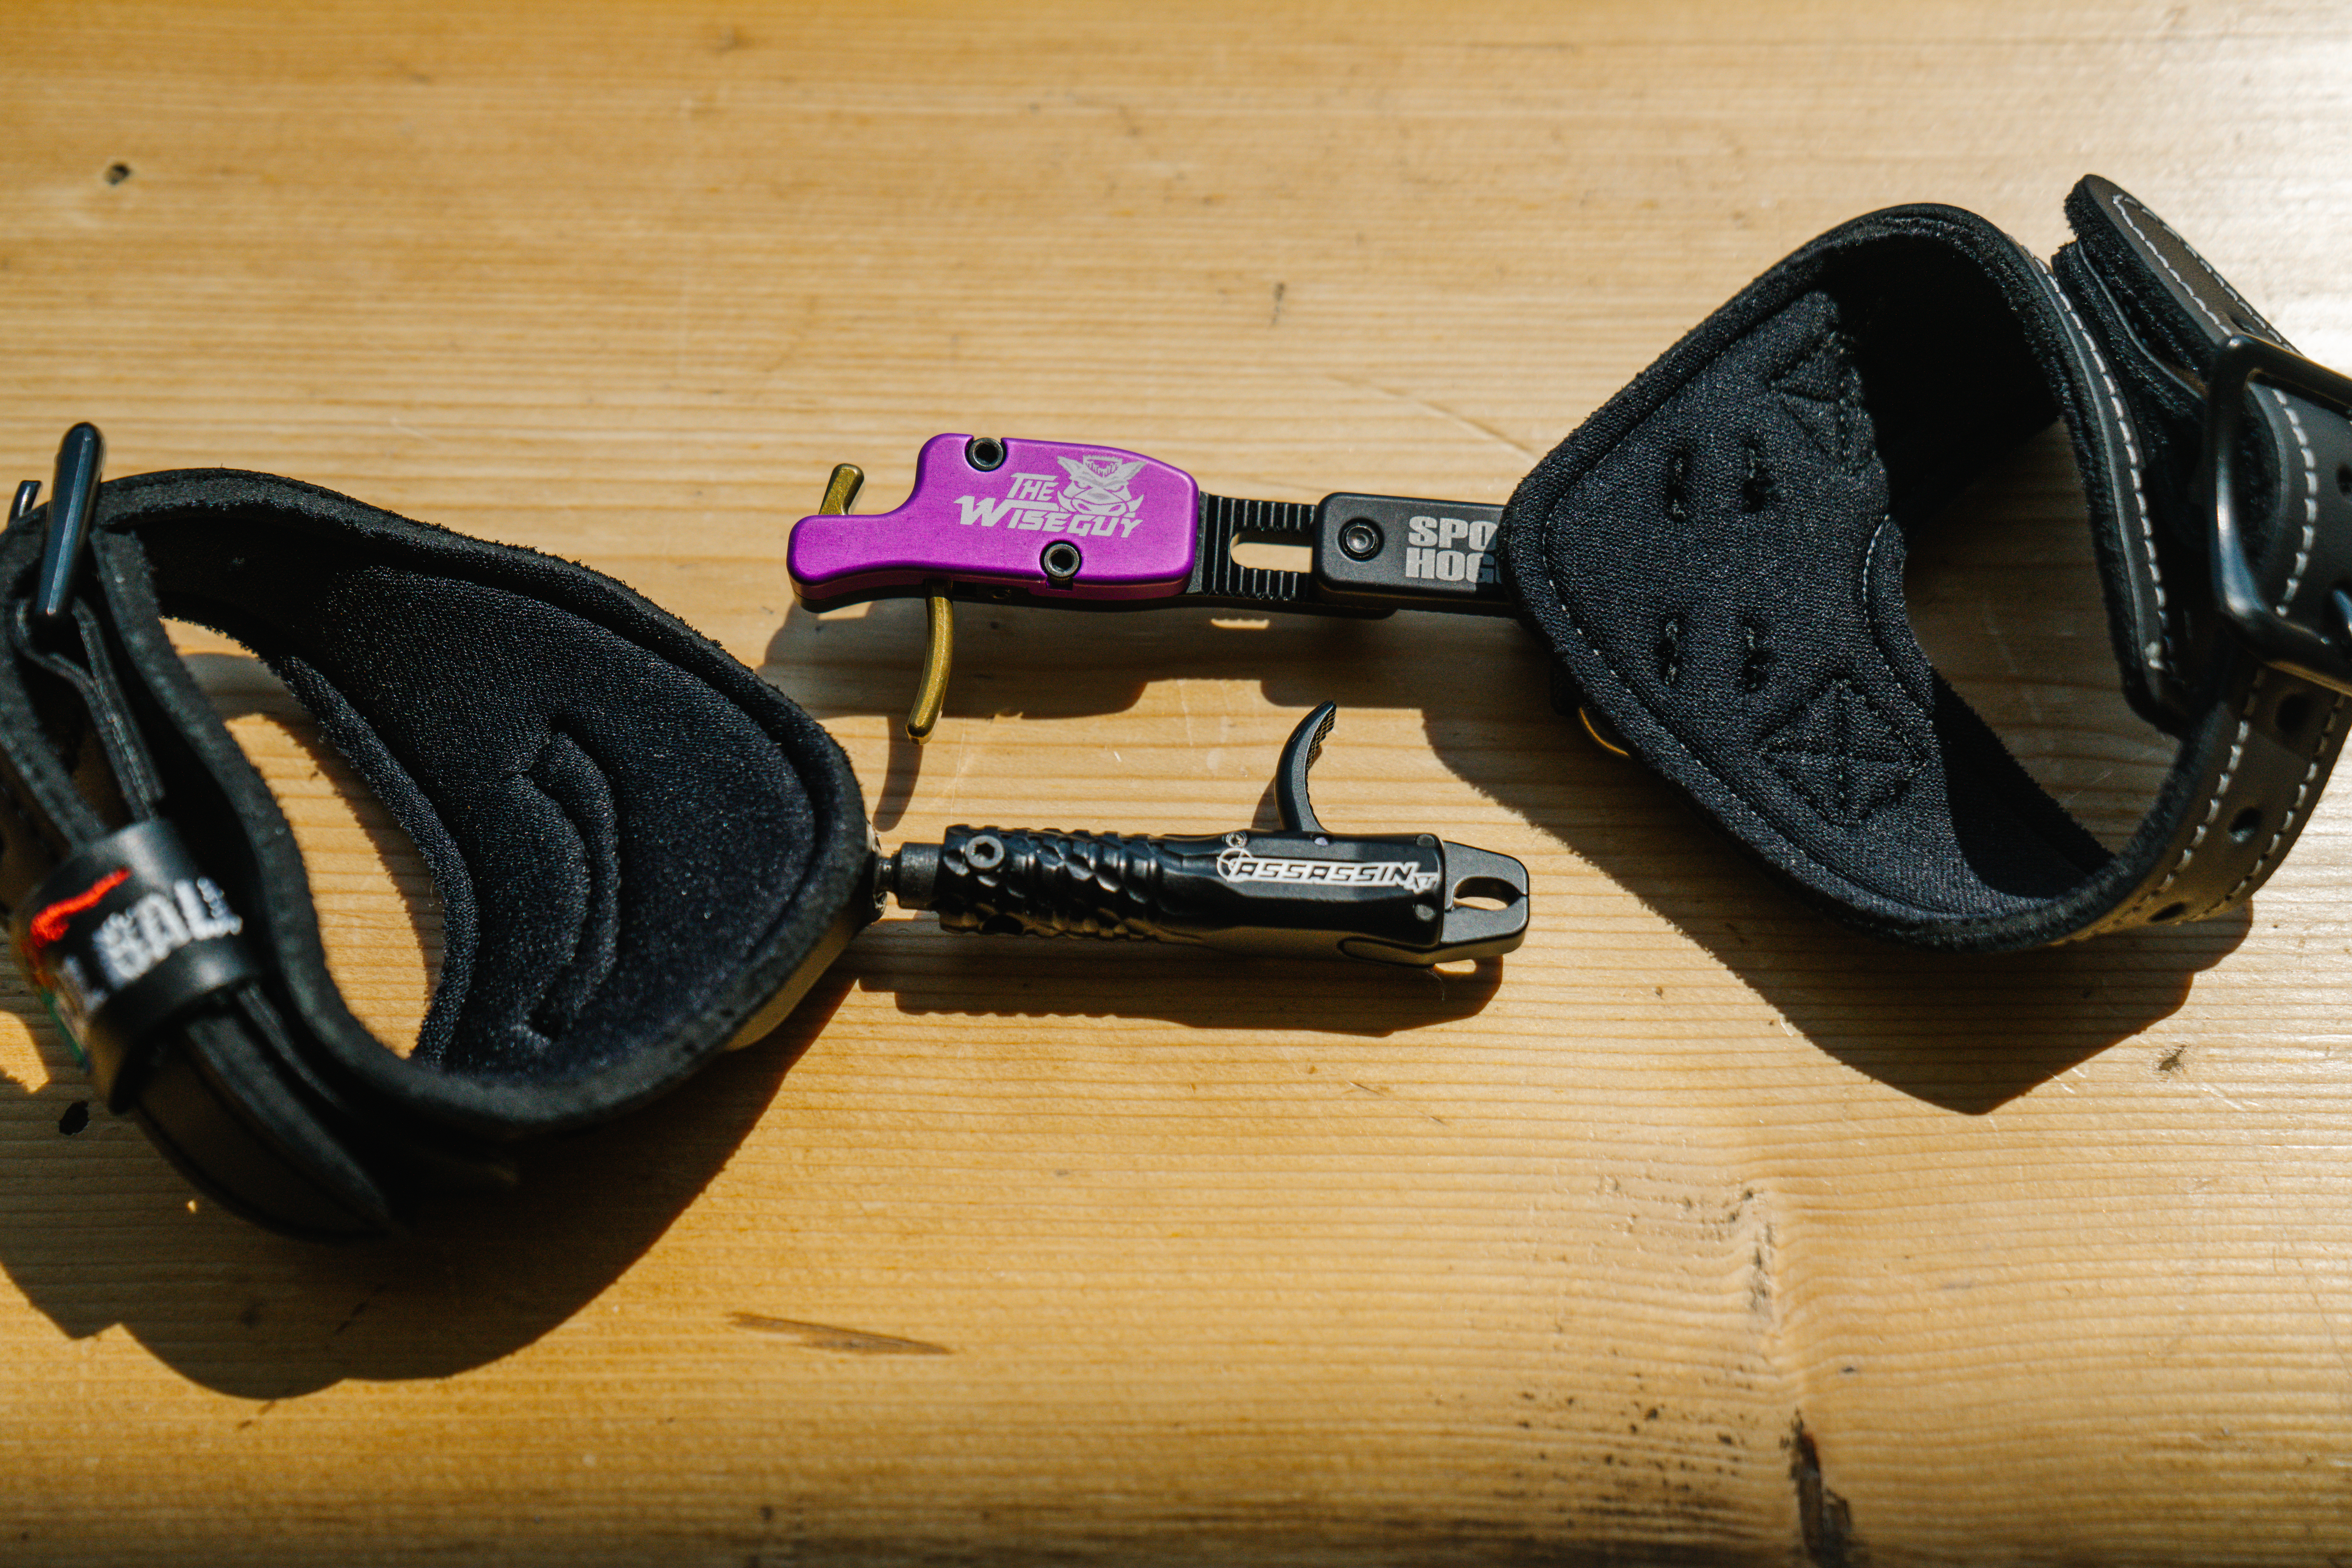
A trigger release requires the shooter to work a trigger mechanism to fire the release. Without pressing the trigger, the release will not fire. The two main types of trigger releases are the index release and the thumb button release. These are the most common releases for hunting.
A triggerless release requires the shooter to perform an action other than pressing a trigger to fire the release. The two main types of triggerless releases are the back tension release and the hinge release. These releases are most often used for target shooting or as form building tools.
Now that we’ve defined ideal shot execution, the importance of back tension, and trigger vs. triggerless releases, let’s move on to the four main types of releases and their applications.
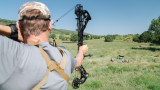
 Index ReleaseAn index release is what most people begin their archery journey using. A shooter attaches the release to their wrist with a wrist strap, adjusting it so that the trigger sits at the first knuckle of their index finger. They clamp the jaws of the release around their D-loop, draw the bow, and pull the trigger (just as they would a rifle trigger) to release the arrow.
Cutting the DistancehostRemi Warrenprefers an index release for hunting, mostly because of how it stays attached throughout the hunt.
“It’s always on you and harder to lose,” he said. A lot of folks agree—because of the wrist strap design, index releases are easier to keep track of in the field. The wrist strap also adds a layer of security when drawing the bow; unlike a handheld release, you can’t accidentally let go of your index release at full draw and send it through the riser.
Detractors of index releases typically point to two primary problems.
The first is the wrist strap. While the wrist strap is a convenient way to keep track of your release, some folks find that they’re uncomfortable to wear (particularly with late-season layers), make for an awkward draw, and result in inconsistent anchor points if the wrist strap shifts up or down your wrist.
The second (and biggest) problem is that an index release, more than any other style of release, can encourage you to punch the trigger. This is because of the amount of control we have over our index finger—it’s easy to give in, slap the trigger, and force a shot. Although having the control to “make the shot happen” can be valuable in the right context, as we covered above, punching is almost always undesirable and can lead to major problems.
Steven Rinellamight sum up a lot of folks’ feelings about the index release best. When I asked him about it, he simply said, “I can’t say I actually like it. It’s just what I’m used to.”

While most releases are adjustable to preference, back tension releases require a little personalized setup. Using a handheld bow scale and an allen key, set your back tension release to fire at a few pounds over your holding weight. For example, if you were shooting a 60lb bow with 80% let-off, you’d set your back tension release to fire at 14.5 lbs, which would be 2.5 lbs over your holding weight of 12 lbs.
To fire, hook your release onto your D-loop, hold down your safety and draw the bow. Once you’re at full draw, establish your anchors and sight picture, then let off the safety. If set correctly, the bow will not fire. To activate the release, apply pressure through back tension by squeezing your shoulder blades together while letting the pin float on the center of your target. Once the extra force you exert reaches 2.5 lbs, the release will activate and the bow will fire.
There are a couple tips to keep in mind when getting used to this style of release. It helps to practice this a few times with arelease trainerbefore moving on to your bow. Once you have a feel for it, shoot as many arrows as you need to at a large target set at about five yards. As you become more comfortable, slowly increase the distance until you’re shooting normally. Everyone does this at their own pace—I set a buddy up with a back tension release and he was shooting lights out after the first dozen or so arrows, whereas I had to blank bale twice as many before I felt comfortable moving beyond 10 yards.
An important note about the safety: The safety on a back tension release, like any safety, prevents the release from firing. If you do not hold the safety down through your draw cycle, the release will fire as soon as you hit 14.5 lbs and you will punch yourself in the face. It’s happened to me, it’s embarrassing, and it hurts.
All that said, I have a tension release and shoot it regularly, particularly when I find myself getting punchy with my thumb button. Shooting a back tension release is a great way to come back to center and work on form. Plus, they’re a lot of fun to shoot.
Just because I only ever use my back tension release in a target shooting environment, doesn’t mean people don’t use them in the field. Here’s a video of the great and powerfulJoe Rogan smoking an elk at 70 yardswith a back tension release.
The Hunting CollectivehostBen O’Brienalso uses a back tension release in nearly all of his shooting, including out in the field. “I feel like it just makes me focus on my form so much more,” he said. “There’s no time form is more important than when you’re shooting at an animal—you’re trying to make a perfect shot.”

For one, I think handheld releases in general give you a more comfortable, natural draw, because you draw with your hand, not from a strap around your wrist. Think about doing a pull up. Which sounds more comfortable, gripping the bar in your hands or using a strap around your wrists to pull yourself up?
In my own experience, another benefit to the thumb button (and all handheld releases) is that it provides a more consistent anchor point because you hold it the same every time. You don’t have to worry about the strap slipping up your wrist, or getting hung up further down your wrist, and shifting your anchor.
Most importantly, I think that thumb buttons encourage better form as they’re easier to activate with back tension. You load the trigger a little with your thumb, then let your back do the rest.
I also appreciate that, in a hunting situation, sometimes the shot has to happen right now. This is why I prefer a thumb button release over a pure back tension release for a hunting application. If I have to thread the needle while an animal pauses momentarily in a shooting lane, I can load my trigger more heavily with my thumb and get the shot off quickly.

You’ll sometimes hear a hinge release referred to as a “clicker,” in reference to the clicking sound some make just before they fire. This click lets the shooter know the shot is about to break, and most hinge releases are equipped with this feature.
I talked toBeau StoneofStraight 6 Archeryin Bozeman about why the hinge is his release of choice. “I like the hinge because of the control it offers, even though it still gives me the surprise release I’m looking for,” he said.
He likes the fact that there’s no trigger to punch, but prefers it over a pure back tension release because the click feature keeps him oriented throughout the shot.
“It’s a two-stage shot,” he said. “Everything before the click is draw and setup, and everything after the click is aiming and execution. I always know where I’m at in my shot process, and I think that leads to better performance. Even though I know when the shot is close to breaking, you can’t really punch it. I think it’s the best of both worlds.”
There are many competition shooters that agree with him—the hinge and thumb button are the two most popular styles of release in competitive shooting.
If you’re interested in trying a hinge release, start out by following the same tips I detailed in the back tension release section. In short, use a release trainer to get a feel for it, and once you graduate to your bow, start close to the target, slowly increasing distance until you feel comfortable.
Choosing the Right Release for YouSo how do we choose? The first step is identifying your goals.
For hunting, most folks would do well to shoot a thumb button or an index release, as both have triggers and both are easy to operate in the heat of the moment. Things are never perfect in the woods, and sometimes we need the option to deviate from absolute perfection in our form. That might get some people’s hackles up, but that’s just the reality of it. If you were to ask me which I prefer, I’d go with the thumb button over the index release—the thumb button release encourages good form while still having the trigger to lean on.
For target shooting, a lot of the best shooters I know suggest shooting a hinge or thumb button. When I’m putting in time at the range, I find myself gravitating towards these options, and if you watch any professional competition, these are the two styles of release you’ll see most often.
For working through issues in your form, I’d suggest a back tension or a hinge. Because of their triggerless mechanisms, these two styles prevent punching and demand good form throughout the shot. Shoot them enough, and good form will become a habit.
So what if you’re having some target panic or form problems, but plan to use a thumb button in the field? Shouldn’t you practice like you hunt?
This is the exact reason I’m an advocate of shooting multiple releases. For instance, I mostly practice with the thumb button I hunt with, but if I notice I’m beginning to punch the trigger, I’ll switch to a back tension for a few days to iron out my form. Once I’m satisfied with my shot, I’ll return to shooting with my hunting release. I own five or six releases, specifically for this purpose.
It’s worth noting that this multiple release approach to practice is another reason I prefer the thumb button over the index release for hunting. Because most handheld releases are ergonomically similar to each other, the practice I put in with my hinge or back tension release readily translates to the thumb button I hunt with.
The next step to choosing a release is identifying your preference. This is pretty easy, not to mention fun. Schedule some time at your local proshop, shoot a bunch of these releases (ideally with a pro who can walk you through them), and see what clicks with you.
Shoot What WorksOf course, whatever your goals are, don’t be afraid to be an exception to the norm. Maybe you can’t stand the thumb button I prefer. Beau and Ben refuse to hunt with anything other than their preferred style of triggerless release. I’m sure there’s some competition archer out there who shoots his index release dead nuts.
So consider your goals, try out a few releases, and shoot whatever you feel most confident and capable shooting. As long as you put in the practice, taking the time to choose the right release for you will do wonders for your confidence and accuracy, in the field and on the range.
Sign In or Create a Free Account
Related

Hunting Gear
Archery 101: How to Choose a Bow Sight

Hunting Gear
Photos: How to Build an Archery Target Stand