How to Care for Venison in Hot Weather


Velvet huntsare all the rage these days. With states like North Dakota, Nebraska, Kentucky, and a handful of western states offering early September openers, the options are plentiful.
They’re fun, too. Velvet bucks are predictable in a way that hard-antlered deer usually aren’t. The food-to-bed-bed-to-food reality of these bucks makes them as attractive as the novelty of a fuzzy-antlered mount on the wall.
There are some downsides to these hunts, however. Pressure is often intense, the bugs can be almost plague level, and then there isthe weather. You can expect plenty of sunshine and temperatures that could flirt with triple digits. The big concern here is, of course, meat care. If you aren’t prepared to handle a dead deer in beach weather, you risk losing yourvenison.
Check The Clock
When we shoot a deer, the clock starts ticking. If it’s 25 degrees and not likely to climb much higher, you have plenty of time. If it’s 90 degrees in the day and 70 at night, you don’t. This should inform shot choice. Sweltering weather isn’t the time to tryyour first 60-yard bow shotat a whitetail. It’s time to really understand your effective range and stick to it.
A gut or liver hit, which will require hours of waiting before attempting a recovery, is a bad deal. You can come out of it with a good-to-eat deer, but the odds drop with each passing hour. Instead of waiting all night, you might have to make the call to start blood trailing at 1 a.m., after you’ve given it as much time as you can stomach.
Think about what time you have and might need before you shoot. And if you do shoot, figure out what the parameters are for recovery. Your goal is to find a balance between a quick(ish) ethical recovery attempt and the reality that too much time passing will result in meat spoilage.
Found Him, Now What?
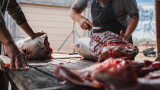
I’m a big proponent of owning the whole deer hunting process, which means I butcher my own animals. Not everyone does, but everyone should at least understand how to field dress and piece out a deer.
This knowledge comes in handy right after you find your deer because the first thing you need to do is get itguttedso you can open up the chest cavity. Some heat, which is the cause of spoilage, will dissipate once you take everything that’s inside the deer out. That’s a start.
The next concern is the hide. If you plan to move the deer carcass, you might not want the hide off because it protects the meat from flies, debris, and dust. It also traps in heat. If you don’t have access to some blocks of ice to shove in the chest cavity and wedge between the pelvis, you had better consider skinning your deer ASAP. This is easy to learn and really not much of a challenge witha sharp skinning knife.
The goal when you’re racing the spoilage clock is to know how to get your deer broken down as much as possible. For me, that’s going to be totally boned out and sorted into individual, gallon-sized freezer bags. This allows for easy layering in acooler. Look at it like a meat and ice lasagne. Not only does this prevent spoilage even when I’m tent camping for whitetails, it also seems to wet age the meat, which is a nice bonus.
Third-Party Help
What if you don’t want to butcher your own deer? Then you better know where you’re taking it, and what the hours are. You should also break it down as much as possible and pay close attention to how you store your deer. If it’s whole but filled with ice, you’re going to want to flip it every few hours so that it doesn’t trap too much body heat on one side and start to spoil.
Before that even, figure out the butchering logistics and anticipate wild card events like what I dealt with in 2013while hunting North Dakota whitetails. The buck I killed during my second sit came down to the river in 90-plus-degree temperatures. When he piled up on the bank, I knew I needed to make an ice run.
No biggie, I thought. But what I didn’t anticipate was that the resident elk season was open as well, and the successful elk hunters bought out the nearest town’s ice supply. That turned a routine, 90-minute round trip into a four-hour scramble just to get ice. An unanticipated hiccup in the plan, one that tacks on extra hours before cooling the meat, could be the difference between spoiled venison or not.
Know what you’re getting into. Learn the basics of field butchering, or nail down your logistics if you need the help of a pro (or both). Do everything you can to make sure to not onlymake a good shotbut to ensure that your post-recovery efforts result in zero venison loss.
Shop
Sign In or Create a Free Account
Related

Wired to Hunt
How to Hunt the Rut in Hot Weather
Hunt
How to Care for Venison in Hot Weather

