
When it comes toturkey shotguns,modern choke-and-load combinations are capable of throwing ultra-tight patterns out to 40 yards or more. At the same time, turkey hunters should remember that a properly outfitted scattergun’s pattern is likely no larger than a baseball at 10 to 15 yards.
I learned my lesson many springs ago in Nebraska when I missed a Sandhills gobbler at 10 yards thanks to not taking the time to sight in and pattern my gun. I went into that hunt blind and cocky, thinking I could just load up the ol’ 870 with some No. 6 Hevi-13 and call it good.
The fact that I whiffed on that beautiful hybrid gobbler still haunts me. Since then, I take the necessary time each spring to guarantee my gun’s pattern and ensure I know exactly where it’s pointing.
Sights and Chokes
Before we get into the details of chokes, loads, and pattern density, the discussion needs to start with sights.
Many turkey hunters have a 12- or 20-gauge shotgun that serves more than one master, meaning the gun is used for waterfowl, upland, small game, and turkeys. That’s fine. What is not fine, is relying on a single or double-bead sight system to determine where a gun is pointing when a turkey is standing in front of it.
This isn’t wingshooting. It’s more like big-game hunting where you actually aim at “kill zone.” Adding a red-dot or fiber-optic sight system that helps your eye line up in the same exact position every time you peer down the barrel is an important first step toward.
When choosing a sight, consider where and how you hunt. If you plan on sitting and calling from a blind, every option is on the table. However, if you’re like me and can’t sit still for too long, choose a low-profile, super-secure sight that won’t snag on brush or easily get knocked off kilter.
Today’s shotguns come with an assortment of chokes already in the box. Many guns include the fan favorites of improved-cylinder, modified and full. Some guns might even come with additional chokes marked “extra-full” or “turkey.”
Regardless of what comes in the box, I firmly believe in investing in a quality aftermarket choke designed specifically for turkey hunting. These chokes are engineered specifically to handle high-energy turkey loads and squeeze even more performance out of your turkey gun.
When choosing a choke’s constriction, the general rule of thumb is less constriction for larger shot (such as 4s and 5s). For lighter loads or smaller shot, such as No. 6, you can go tighter with a choke. Remember, 10/1,000thof an inch change in constriction can be the difference between a great pattern and a loose one. It pays to experiment with two or three to see which interacts with your gun and shells the best.
Lastly, make sure any choke you decide on is rated to handle today’s heavier-than-lead loads. If your turkey choke is a bit older, consider upgrading to a newer model designed with the latest turkey loads in mind. This can improve consistency and save unnecessary wear and tear on your gun barrel.
Patterning Your Gun
There are a hundred ways to pattern a turkey gun, but here’s a step-by-step look at the basics.
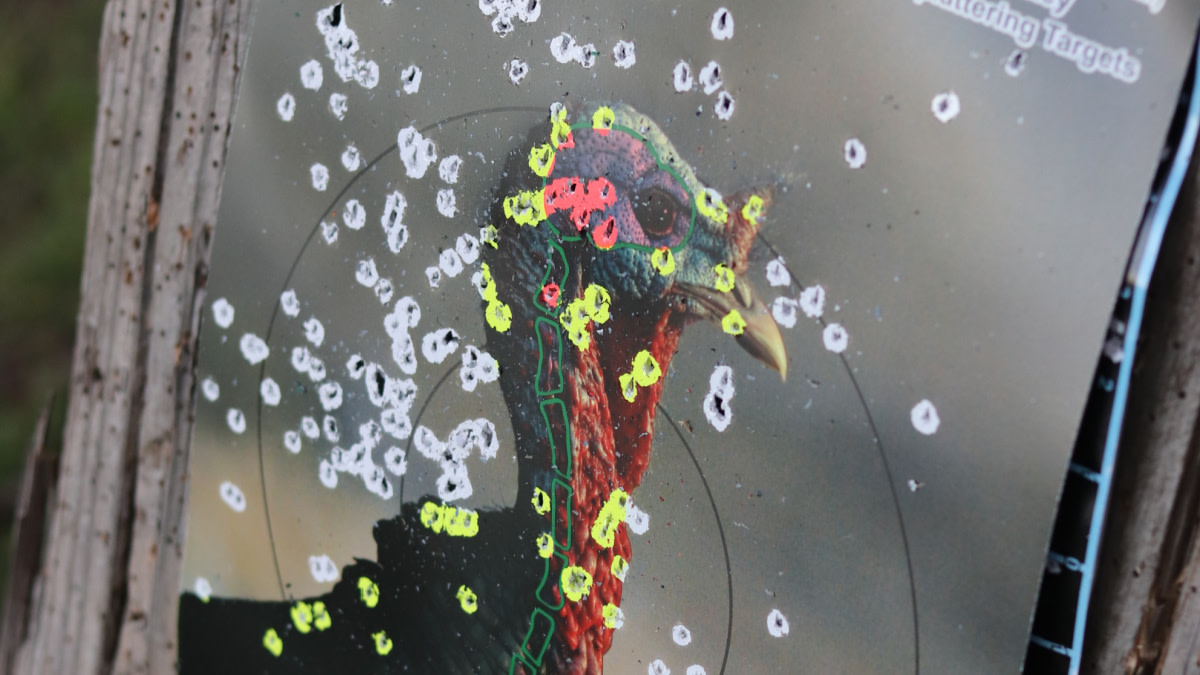
First, place a target at 15 yards. There are many affordable target options available that show kill zones or “splatter” on the outline of a turkey from the breast up. But at 15 yards, some blank sheets of paper with a defined aiming point will work fine. I use letter-sized sheets of paper and draw a 1-inch circle in the middle with a Sharpie.
Load up a trap shell, such as a 1-ounce game load of No. 7 or 8 shot, and shoot the 15-yard target. Check where your pattern density is the most consistent in relation to your aiming point and adjust your sights accordingly. Once you’re satisfied at 15 yards, move to 30 yards and switch to a turkey target that shows where pellets will strike a bird.
Then, load up a heavy game or field load, like a lead shotshell you’d use for pheasant hunting, and keep fine-tuning your sights and point of aim as you shoot the 30-yard target. Using trap and field loads for the first two parts of the patterning process saves both your wallet and shoulder from cycling through turkey shells.
Also, shoot from the same exact position and aim at the same spot every time. If you have a bench rest, great. If not, try sitting against a tree and using your knee as a rest like you might in the field. Be as consistent as possible to achieve the best results.
After your pattern is locked in with game loads at 30 yards, it’s time to move up to turkey loads. Today’s heavier-than-lead or tungsten-matrix loads are hard to find and spendy, but don’t get cheap when it comes to what goes boom.
So, what makes a good turkey load? While there are a number of critical factors to consider—shell length, lead or alloy type, shot size and weight, pellet hardness and density, velocity and retained energy—I think the only factor that matters is how a specific shell meshes with your gun and choke.
Think of it like this equation: gun plus choke plus shotshell equals result. Changing any one of the factors will affect the outcome, which means finding the most efficient combo takes time and money. However, cycling a few rounds of varying loads from different manufacturers will eliminate any guesswork and pay large dividends in the field.
Opinions vary on whata good turkey-killing patternlooks like at 30 yards. Some say it’s consistently having at least 100 pellets in a 10-inch circle. Others say it requires X-amount of pellets within the kill zone—the brain and vertebrae—of the turkey target.
I lean toward the latter, simply because pellet count varies between shot sizes and weights. For example, a 3-inch, 1½-ounce load of 4 shot will have fewer pellets than a 3-inch, 1½-ounce load of 8 shot. Along the same lines, a 3-inch, 1½-ounce load of 6 shot will have fewer pellets than a 3-inch, 17/8-ounce load of 6s. As a result, comparing total pellet counts within an arbitrary circle would not lead to an accurate comparison of patterns. If any of the above punch 15 to 20 holes in the kill zones, I know that shell is capable of dropping a gobbler in its tracks.
Once I settle on a gun-choke-load combo that produces a solid pattern at 30 yards, I shoot three more rounds at 40 yards for confirmation. If the pattern breaks down in any way, I go back to the drawing board at 30 yards to find another combo I like.
Now, most folks stop after confirming the pattern at 30 or 40 yards, but as a final test I’ll shoot one shot at 15 yards. If the pattern blows a baseball-sized hole through the target exactly where I aim, that’s the final vote of confidence I need.
Bottom line? Missing a turkey sucks, but most misses can be avoided by taking a pre-season trip to the range. In fact, taking a couple hours to pattern your gun can erase days (and sometimes years) of frustration that result from an airball in the field.
Shop
Sign In or Create a Free Account
Related

Turkey
A Guide to Hunting Wild Turkey


Turkey
How to Choose the Right Turkey Load


