How to Preserve Bird Capes for Fly Tying and Decoration


When the gun smoke settles and the bird is in hand, I often find myself staring at the intricate patterns and surreal colors that enrobe our avian prey. It pains me to sit on the bank of the river plucking beauty from skin only to watch the plumage float away into the void.
Bringing those feathers home and using them to their fullest potential has become a passion of mine. Whether it be on theshank of a flyor proudly displayed on the wall as an alternative to traditional taxidermy, waterfowl or upland capes can remain useful long after the breasts and thighs are gone.
Pluck or Skin?
There are a two post-mortem options if a hunter is keen on keeping some feathers: plucking or skinning. Plucking out just the most attractive feathers and storing them ins bag involves much less effort than the other alternative, but skinning a bird offers a few major advantages. An intact and preserved cape means the feathers will remain organized, clean, and in presentable condition. This method also lets youcook birds whole, providing more meat as well as opportunities for cool presentation dishes. Skinning is a time-consuming process, but it’s worth noting that you can freeze unfinished bird capes until hunting season is over and time is more plentiful.
The obvious disadvantage of skinning a bird is that you don’t get to eat that skin. Just as it’s painful to watch plucked feather float away, it can also be difficult to cover fatty, delicious mallard skin in chemicals. Sometimes a better call is to just pull out some prime plumage. Likewise, a bird that got chewed up by a dog or tuned into Swiss cheese with a 3 ½-inch shot shell shouldn’t be saved for its cape. This process is too much work for a beat-up cape.
Initial Cuts
Make an incision along the keel bone, that bone fin that separates the two breast lobes. Continue this cut up the throat to the jaw and down the breast to the anus. Gently pull the skin away from the breasts and neck, cutting when you have to and trying not to put holes in the skin.
Next, separate the head from the neck at the first vertebrae, leaving the head connected to the cape. Holding the feet, push the legs upward towards the body to separate the skin from muscle. Cut through the leg bones with shears, leaving the legs connected to the cape if you choose.
Skinning the Wings
Now comes the tricky part. Make an incision from the body along the inside of the wings, following the bone. The skin is very thin and prone to ripping, so work carefully. Snap and separate the wings at their last joint toward the wing tips. You should then be able to work the bone, tendons, and muscle free from the skin and feathers.
Finishing Cuts
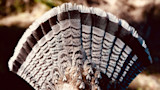
Continue carefully pulling the skin away from the body, working your way from the breasts around the wings to the back. The last place the skin will be firmly connected to the carcass is at the tail. Using a pair of kitchen shears, cut the tail muscles from the body near the anus. You can skin out the skull or simply leave it intact. Duck bills will shrink in the drying process while grouse beaks will remain similarly sized.
Fleshing the Skin
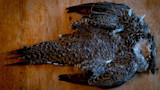
Slacking or skimping on this step is a bad idea. It will take some practice to get a feel for removing residual fat and muscle from your bird cape, but it’s well worth the effort. Start on the edges and gently push and cut the fat, meat, and tissue off the inside of the skin. I prefer using a curved beard trimmer but it is possible to do the job with a razor or sharp knife. On a fat mallard this job will take some time to complete, but the process is much quicker on a bird like a grouse. Some holes in the skin are inevitable, but they’re usually unnoticeable when the process is complete. Keep in mind that any missed tissue will become a breeding ground for bacteria, leading to a rot in your trophy.
Cleaning the Bird
Once the cape is free of excess tissue, it’s time for a wash. A simple concoction of dish soap and warm water in a tub will help reduce odor and clean off any dirt or blood on the feathers. Dunk the skin and lightly manipulate it without being too aggressive on the feathers. Dunk again in clean water and lay it out on a table. Blow-dry the feathers until they return to their original appearance.
A Healthy Dose of Borax
Flip the cape skin-side up and pour a liberal amount of Borax on the skin. With gloves on, work it into all the nooks and crannies of the neck, wings, legs, and tail. It should look like Tony Montana’s desk in the final scenes of “Scarface.” Leave the bird someplace cool to dry and cure for a week then shake off the Borax and repeat the process with another coating. Leave it for another week and shake it all off again. At this point in the process you should have a completed cape, ready to be hung on a wall or stored with your fly andlure tying materials.
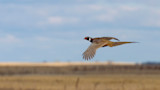
In my home state of Wyoming, I can consistently harvest a variety of ducks, geese, grouse, turkey, pheasant, chukar, and snipe. Each one has its place in the fly tying drawers or on the wall and would cost a lot of money or be near-impossible to purchase. Get the most out of your birds and consider holding onto a couple of your favorite capes this season.
Shop
Sign In or Create a Free Account
Related
Upland Birds
How to Preserve Bird Capes for Fly Tying and Decoration
Upland Birds
Ask MeatEater: How Do You E-Scout for Upland Birds?