5 Ways to Preserve Apples


One of my favorite things about apples is the endless spectrum of flavor, shape, texture, and color—when you pick them outside of the supermarket. Most orchards offer the same handful of popular varieties, which I love, but they’re only a small slice of the pie. These commercial varieties aren’t popular because they’re the best, they’re popular because they’re the best for commerce. They’ve been selected for things like size, uniformity, durability, and sweetness—making them easier to transport and sell. They’re all cloned by grafting, so they’re genetically identical and you always know what you’re getting.
If you look outside the market, though, maybe even right outside in the yard—you’ll find a surprise on every tree. Apples grown from seed, like the ones that spring up in ditches, field edges, and smaller, more adventurous orchards offer a universe of flavor, not to mention a dogged tenacity for biodiversity, with no two seedlings ever the same.
Local orchards often have great prices for “utility apples,” “critter apples,” or “drops.” I like to get a couple bushels of these to mix in with the wild and feral fruit I’ve picked myself. I use as many varieties as I can find to add depth and interest to my pantry and winter meals. Every year I try at least one new method of preserving apples, but I have a handful of essentials, and I always start with sauce.
Basic ApplesauceIt’s peasant food, it’s primitive food, it’s baby food, and that’s why everyone loves it. Applesauce is likely one of the first things you ate as a child, and your mother, and her mother too. I eat it plain, straight out of the jar like when I was a kid, but I’ve also come to love it as a staple in the kitchen to add subtle sweetness and body to everything from batters to braises. Some like it smooth, some like it chunky, spiced, sweet, or plain, but no matter how you prefer it, at its heart it’s just warmed, soft apples, and all you need is a pot.
Time: 45 minutes (mostly passive) Yield: 5 pints
Ingredients5-6 lbs. mixed apples 1 cup water Spices (optional, I omit to keep it more versatile but you can add cinnamon, allspice, ginger, nutmeg, etc.)
Methods
- Core and chop apples. Peeling optional.
- Put water and apples into a large pot (heavy-bottomed is better) over medium heat.
- Stir and mash down as the bottom layer of apples softens.
- Lower heat once water is absorbed and stir periodically to avoid burning.
- Simmer and stir until all of the apples are soft.
- Cool slightly and mash by hand or blend until you get the consistency you like. I use an immersion blender, leaving a few chunks and bits of skin. You can also run it through a sieve or food mill for silky smooth sauce.
- At this point, you can either cool completely and pour into containers to keep in the fridge or freezer, or you can pour hot into canning jars and water bath process—15 minutes for pints, 20 minutes for quarts (followingsafe canning instructions).
Spiced Apple ButterMy second essential apple preserve is butter. It is truly the essence of apple, cooked down dark and concentrated with warm spices into something I can spread on buttered toast every morning for the rest of my life and not tire. Aside from enjoying it as a sugar-free upgrade from jam or jelly, I love to add it to sweet and savory sauces, braises, stews, and baked goods for rich, caramel-apple flavor.
Time: 3 to 24 hours depending on method Yield: 6 pints
Ingredients5-6 lbs. mixed apples 2 cups water or apple cider ¼ cup apple cider vinegar ½ tsp. cinnamon ½ tsp. salt ¼ tsp. nutmeg ¼ tsp. ground ginger ¼ tsp. warm spices of your preference (anise, cardamom, etc.)
Methods
- Core and chop apples. Peeling optional.
- Put water, cider, vinegar, and apples into a large pot (heavy-bottomed is better) over medium heat.
- Stir and mash down as the bottom layer of apples softens.
- Lower heat once the liquid is absorbed and stir periodically to avoid burning.
- Simmer on low heat and stir until all of the apples are soft.
- Lower heat all the way and cook down, slowly, until the apples have reduced to a dark, jammy consistency. This can be done on the stovetop, the woodstove, in the oven, or in a slow-cooker. I prefer the woodstove if it’s already running.
- Cool slightly and blend until you get the consistency you like. I use an immersion blender, leaving a few chunks and bits of skin. You can also run it through a sieve or food mill.
- At this point you can either cool completely and pour into containers to keep in the fridge or freezer, or you can pour hot into pint jars and water bath process for 15 minutes (followingsafe canning instructions.)
Dried Apple RingsOnce I’ve done a round of sauce and butter, I like to fly through the rest of my large apples by slicing them thinly and drying them on a screen in a sunny window. These store well at room temp and make a sweet, chewy addition to breakfasts, baked goods, or anything roasted or toasted. They’re also my favorite in a hunting pack and as a car snack.
Time: 1 to 48 hours depending on method Yield: As few or as many as you want.
IngredientsApples Water Lemon Juice (optional) Salt (optional) Sugar (optional)
Methods
- Fill a large, wide bowl with an inch or so of water and a splash of lemon juice if you’d like a lighter-colored flesh.
- Slice the cored apples crossways in ⅛-¼" slices.
- Swish around and let sit while you slice the next apple.
- Lay slices to dry on a clean cloth or paper towel.
- Transfer to a drying screen (could be a clean window screen or hardware cloth).
- Sprinkle lightly with either sea salt or sugar. This is totally optional because they're delightful as they are.
- Place screens in a warm to hot ventilated place. This can be done in a dehydrator or in a low oven with the door propped open (on an oven-safe surface). I do it either elevated over my woodstove or in my loft near a sunny window.
- Check your apples every couple of hours and remove from heat when they’re crack-dry. This can take anywhere from 2 hours in a slow oven to a couple days in a sunny window.
- Once they’re fully dry you can store them in your pantry (or your glove compartment).
Apple Scrap VinegarAfter all of this coring and peeling, you’re staring at a mountain of scraps. If you want to squeeze the most juice out of your apples, you could either add these to your compost pile, or take a portion of them and turn them into vinegar. Apple scrap vinegar is one of my new favorite additions to the kitchen. Its bright and effervescent taste is so lively in dressings, marinades, pan sauces, and shrubs.
Time: Prep: 5 minutes, Fermentation: 3-6 weeks Yield: 1+ quarts
IngredientsApple cores and peels, enough to loosely fill a ½-gallon jar Water 3 tbsp. sugar Splash of raw apple cider vinegar (optional)
Methods
- Loosely fill a half-gallon jar with apple cores and peels, leaving 2” headspace.
- Dissolve 4 tbsp of sugar in enough water to completely cover the apples, leaving 1”-1.5” headspace. Add 1 to 2 tablespoons of raw apple cider vinegar if you want to give the fermentation a head start, but it’s not essential.
- Use a glass or ceramic weight to keep the apples submerged.
- Cover the jar with cheese cloth or a paper towel and secure with a rubber band.
- Store for thre to six weeks somewhere away from direct heat and sunlight where you can check on it regularly to make sure the apples stay submerged. A vinegar mother should form after a couple weeks, which is great, but if you see a film of mold you should skim it off and remove any apples it was in contact with.
- At six weeks your vinegar should be mature enough to strain into a clean bottle, cap, and keep on your shelf.
Note: This vinegar should not be used for canning purposes because its acidity would need to be tested before canning safely.
Pickled CrabapplesI hate to pick favorites but I think I saved the best for last. Pickled crabapples are jammy little pearls that I cannot get enough of. They’re easy—pickled whole, stem and all—and they look lustrous in the jar, on a pork chop, and they shine bright and tart with charcuterie.
Time:1 hour (mostly passive) Yield: 6 pints
Ingredients2 qts. crabapples, stems on 3 cups cider vinegar 3 cups water 6 cups sugar 1 stick cinnamon 1 tbsp. whole allspice 1 tbsp. whole cloves 1 tbsp. whole cardamom Add any herbs or spices of your liking to the spicebag
Methods
- Tie all of the spices in a spice bag and put in a pot.
- Combine all ingredients in the pot except crabappless and bring to a high simmer until the mixture has thickened to a syrup.
- Add crabapples and simmer on low until apples are fork-tender.
- Spoon crabapples into sterilized jars and cover with the syrup, leaving ½” headspace.
- Either refrigerate or water bath can (followingsafe canning instructions) for 25 minutes for pints.
Shop
Sign In or Create a Free Account
Related
Cooking Techniques
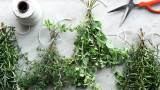
6 Ways to Preserve Herbs

Cooking Techniques
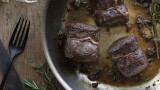
How To Make the Perfect Steak Sauce