My aggressive calling had enticed the herd into viewing distance, and now they were closing in to archery range. We were pinned. I found myself lying uncomfortably on my back, staring up at the quaky treetops, and my client was on one stable knee. I noticed his nocked arrow shaking like the trembling aspen leaves above. As the herd crossed a small stream and passed in front of us, one of the larger, trailing satellite bulls came to a broadside stop to quench his thirst. When the bull’s face dropped down to take a drink, the hunter drew back his bow.
After four days of hunting together, my client and I were mentally and physically in sync. At that time, I came up to my knees and pulled up my rangefinder. “Twenty-two yards,” I whispered.
The arrow flew true, just behind the front shoulder. As the bull took off and disappeared into the thick alders, I ripped out a bugle in an attempt to slow his retreating speed. The sound of elk hooves came to an abrupt halt as the bull responded with a roar. Little did this testosterone-fueled bull know that the arrow punctured both of his lungs with a two-inch, triangular hole. His bugle started normal then sunk into a sad, low, dying growl as he collapsed to the ground. We couldn’t believe what we just heard.
We gave the bull an extra hour to die and allowed our adrenaline to subside. Then, we walked the short distance across the stream and through the alder tunnel to find a 400-pound, 326-inch, 6-by-6 Rocky Mountain elk.
We were four miles and 1,500 feet below camp.
That was my first year guiding. I laugh now, thinking back at how mediocre my first few packouts went. Now, 15 years and thousands of pounds of meat later, I’ve figured out a few tricks and techniques to make long, steep, heavy packouts far less grueling.
Having the Right GearBefore embarking on any hunt, you should always be prepared to field dress, butcher, and remove your harvest from the field. However, having a few specific tools can make this daunting task a little easier.
Boots:Make sure your boots have solid ankle support for your added packout weight. TheSchnees Timberlinegets the job done. And asJanis wrote in the past, it's as much about breaking in your feet as it is breaking in your boots.
Pack Frame:Either internal or external will work.Stone Glaciermakes our favorite multi-use hunting backpacks for going into the backcountry.
Paracord:Fifty feet should be enough. Make sure it’s strong enough to hold an elk quarter and to latch down your loads.
Breathable Game Bags:These are super important for making sure you’re keeping your meat clean and insect-free. Argali Game Bags are our favorite.
Knife:Make sure it packs well for use in the field for butchering and processing. We like a small fixed-blade knife with a good grip that'll keep its edge for an entire elk, like theBenchmade Steep Country.
Contractor/Garbage Bags:Use these to keep gear clean from bloody meat. They'll double as a tarp to keep meat off the dirt. This tool also triples as a rain poncho. (Do not store your meat in these bags for long periods as they will trap in heat and moisture, which causes bacteria growth and bone sour.)
Trekking Poles:These are ideal for a more reliable hike in rugged terrain. They add a third or fourth point of contact for optimal balance. You could also swat away a grizzly with them in the right situation.
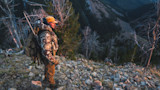
De-Bone Your MeatIn the mountains, you measure distance in strenuousness, not miles. I use a 1 to 10 scale. That being said, depending on your ability level and the difficulty of your packout, you should considerde-boningyour meat. As a young stud, I would carry as much weight as my legs could endure and often ended up shouldering more than half my body weight. These days, I drop that weight down and make extra trips if necessary to save my knees. I feel comfortable packing about a third of my body weight, depending on the strenuousness of the hike out.
If you have a field-dressed elk weighing 400 pounds, you're going to have about 200 pounds of boneless meat to pack out. Add the skull, antlers, cape, and all of your gear to the list, and you’ll want to shed any weight you can. Just one hindquarter weighs 60 to 80 pounds. If you remove the bone and hide, you’ll lower that weight by 10 to 15 pounds. Do the math and bag your meat accordingly.
Removing the bone reduces the total weight and number of trips required to get out. Also, if you find yourself standing over your harvest in warmer than ideal temperatures, separating the meat from the bone will help it cool down significantly.
Loading Your PackThe only downside to deboning meat is the loss of the bonded shape that it has when bone-in. A larger, mature elk hindquarter packs loose and sloppy, especially when de-boned. It can tend to slip out of your compression straps, creating an uneven load. Use a parachute cord to tie multiple, evenly spaced half hitches around your loaded game bags to create a tightly fastened, more secure load. Imagine how you would truss a roast with butcher’s twine or wrap a bail of hay in a mantie tarp. Bring enough rope to fasten the hide and lash down the awkward antlers. Load the bagged meat or hide into the contractor bags for a cleaner haul.
Ideally, you’ll want the heaviest portion of your load just below your shoulder blades. A typical pack frame’s loading shelf is located lower down your back, near your lumbar; to raise the weight of the load, stuff ajacket, sleeping bag, tent, or other lighter piece of gear under your meat. Then add the heavier portion of meat on top of that to evenly distribute the weight. Separate and discard the four lower legs at the knee joint.
Lifting a heavy pack onto your back is onerous. Set your loaded pack on a raised or uphill position and sit on the ground to put it on. Have your partner pull you up or lift it as you stand up. Roll yourself onto your knees or use sturdy vegetation to hoist yourself up if you are running solo.
Know Your Best PathThere is no excuse for a hunter not knowing their prospective hunting terrain in this day and age. With the help ofonXand other GPS navigation systems, being able to pinpoint your direct location and your end destination is as simple as turning on your phone. It’s a good idea to have hard copies of your hunting area, likeUSGS quad maps, andmake sure you know how to read them.
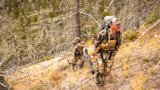
Take the time to study and determine your most accessible route to get your meat out. That may mean packing out to a different trailhead or alongside an open road far from where you're parked. Use the topography and contours of the land in your favor by using ridges and drainages. Aim for sidehill aspects and use switchbacks when climbing and descending to ease the pain. Trekking poles will help save your legs and add much-needed balance.
Leapfrogging your meat is a great way to break up the packout. Let’s say you have a two-hour hike back to your truck. Half of this is a steep climb (7/10), and the remainder is a less painful grade (3/10) down a meandering Forest Service trail. Hike lighter loads of meat up the strenuous part even if it adds an extra trip or two. Then when you have the meat staged on top, reevaluate the weight and the number of loads for the last, less arduous leg of the hike. With a few hundred pounds of meat, hide, and horn to pack out, plan to have three to five 50 to 70-pound loads to get out of the woods.
I wouldn’t go as far as saying elk hunters must enjoy pain, but elk hunters certainly must be able to endure pain. Anyone going on a public land elk hunt who doesn’t think this sounds fun needs to rethink their plans or consider hiring aprofessional guide.Whether you find yourself standing over your harvest deep in the rugged wilderness or along a road unraveling a winch cable from a headache rack, enjoy these moments, what you went through to get yourself there, and embrace the pain.
Shop


Sign In or Create a Free Account
Related
Big Game
3 Tips for Western Big Game Hunters


Big Game
How to Make Your Backcountry Packout Easier