How to Pattern a Shotgun for Hunting


No serious hunter would take a new rifle into the field withouttesting it at range first. Shotguns should be treated no differently. Before hunting, you should make sure that your shotgun works in harmony with your selectedchoke and ammunitionand also that it works in harmony with you. This is done through a process known as patterning.
To pattern yourshotgun, get two pieces of butcher’s paper or newsprint that are approximately 48″ square. Mark the top of the paper so you remember which side is up, then make a 6” bullseye in the center with a marker or duct tape. Next, in a safe shooting location, set the first paper target at a measured distance of 40 yards. Using the choke and ammo that you intend to hunt with, and taking careful aim, fire the shotgun at the bullseye.

Pattern Both Barrels
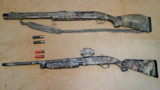
Take that target down, and then fire a round at the second target. For patterning double-barrel or over/under shotguns, make two targets for each barrel and mark them accordingly, i.e., left barrel, right barrel, top barrel, bottom barrel. Then test each barrel independently. Don’t make the mistake of thinking that both barrels are in perfect working order just because one of them is.
Examine the Results
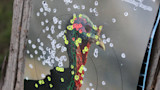
After shooting, lay the targets side-by-side on a flat surface, top side away from you, and make a mark at what you determine to be the center of the impact zone on each target, that area with the densest concentration of pellets. Chances are, this mark will not be on the target’s bullseye. Now draw a 30” diameter circle around that mark.
Step back and take a look. First, you want to make sure that the two targets look roughly the same. Some differences are inevitable, but if the shot patterns are in wildly different positions then you may have flinched a shot and accidentally missed your mark. If so, you should consider redoing the experiment.
As long as the positioning of the patterns is similar relative to the location of the bullseye, count how many pellets fall inside of each target’s 30” circle and divide that number by the total number of pellets that were inside the shotshell. If you can’t find this information through the manufacturer’s website, you can simply cut open an unfired shell and count the pellets.
Pellet Count and Choke Selection
Now compare that figure with the above chart that shows projected pellet counts from various chokes and make sure that your shotgun generally falls in line with these figures. It’s possible that you’ll find a discrepancy. Say that your full choke behaves more like a modified choke, or vice versa. This is an important thing to know when it comes to selecting chokes for your upcoming hunts.
Note Any Discrepancies
Take a look at the distance that separates the center of your pattern from the bullseye. Ask yourself, is it big enough to cause concern? A couple inches is not a big deal forwingshooting, but a foot or more difference can lead to some serious frustration in the field when your missing shots that you could have sworn were dead on. You may need to correct your method of aiming or else try different combinations of chokes and ammunition to see if the problem is correctable in that way.
Finally, and perhaps most importantly, check your pattern for holes. You want to see a fairly uniform placement of shot radiating outward from the center of the pattern. Large holes or other inconsistencies in your pattern can lead to trouble when wingshooting.
Again, correct these issues by experimenting with different chokes and/or ammunition.
Patterning Your Turkey Gun
Patterning yourturkey shotgunis even more important than patterning a gun for wingshooting, especially if you want the ability to make long-range shots out to forty or fifty yards or beyond. Either buy a dozen or so turkey patterning targets or draw 3” circle in the center of a dozen sheets of paper. Set the first target at 10 yards and place the rest at 10-yard increments out to 60 yards. From a seated position, with the shotgun resting on your knee, fire at the base of the 3” circle, or in the case of turkey targets, fire at the junction of the head and neck.
Now examine each target. Take note of the densities of the shot patterns as well as how many pellets landed in the 3” circle or inside the vital head/neck area on the turkey target. One or two pellets inside the kill zone is not what you’re looking for; instead, you want to see the head or bullseye get nicely peppered with shot. Try different choke and ammunition combinations in order to get different results. And be honest with yourself. Is your shotgun really up to the task of killing birds humanely at 50, 60, or 70 yards, every time you pull the trigger? If not, don’t take those shots. A patient hunter who knows how to call birds should be able to put a gobbler on the table every year without shooting past 30 yards.
Shop
Shop AllSign In or Create a Free Account
Related
Hunting Gear
Tips for Rigging up Turkey Hunting Guns
Turkey
How to Pattern a Shotgun for Turkey Hunting


