The Archery Routine that Will Help You Kill More Deer


Fifteen minutes from my house is an extensive archery complex. It offers multiple walk-through courses and a standard range of 20- to 80-yard bale targets. It’s a great place to go to if you want to hone your archery skills—or see what not to do in the weeks leading up to the season.
In Minnesota the bow opener is always mid-September, which means if you go to the range in late August you’ll see plenty offolks who haven’t picked up their bows since the previous season. They’ll be the ones who can barely draw back and are desperately trying to cram a summer’s worth of shooting into a few exhausting sessions.
That’s a bad idea.
Shoot Often
A better bet is to start now. It’s best to view archery practice as a marathon, not a sprint. It’s also a good idea to figure out ways to deviate from traditional practice methods to truly prepare yourself for shots in the field—not just fill foam bullseyes with arrows. Here’s how to do it.
The first step is to make target practice easy. When just finding someplace to shoot is a pain in the ass, you’ll absolutely shoot less often. Figure out if you can legally shoot in your yard, or take a portable target to some open space close to home. If not, you’ll have to figure out a way to fit a few trips to the nearest range into your weekly routine. It works, but it’s not ideal.
The next step is to commit to a schedule. Personally, I find about three to four sessions per week throughout the summer is more than enough. Each session consists of 10 to 20 arrows, and every arrow is released with the full expectation that I’ll hit the bullseye or vitals, depending on the type of target I’m using.
Shoot 3D
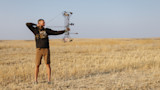
The type of target I use most often is a foam, 3D replica of a whitetail. It may seem like overkill, but I’ve never seen a deer walk through the woods with bright bullseyes on its sides. In other words, high-contrast aiming points on a target do not prepare you for aiming at actual deer. Not only do 3D targets force you to think about aiming at a blank, brown flank, but you can also use them to practice quartering-away and quartering-to angles.
For these shots, simply use one rebar stake the secure the front of the target and then pivot the back end for different shot scenarios. Veteran bowhunters might not need this type of quartering practice,but newbies do. One of the most common things I hear from novices about their good-shots-gone-bad is that they aimed for right behind the shoulder because, well, that’s where you’re supposed to aim. That’s true on a broadside animal, but the point of impact needs to be adjusted with animals that aren’t perfectly perpendicular to you.
Training yourself to aim 5 inches farther back on a quartering-away deer, or tucking it tight to the shoulder on a quartering-to shot is better than flinging arrow after arrow at a broadside target that might only represent a small percentage of the actual shots you’ll take.
Shoot Odd Distances
It’s not enough to just work on quartering shots, though. You also need to consider middle-distance shooting and elevated practice, as well. With the former, no one does it better than outdoors writer and bowhunting junkie Jace Bauserman.
“Since I’m in Colorado, my summer practice sessions revolve around prepping for everything from antelope and elk to whitetails,” Bauserman said. “This means that I might shoot farther than the average deer hunter, but I’m always thinking not only about shot angles but also odd yardages. I prefer three-arrow groups at three targets of various ranges, none of which are set at 10-yard increments.This forces me to gapshoot with every shot and truly think about which pin to hold high or low every time I aim.”
Even though most whitetails are shot top-pin close, there are plenty of bowhunters willing to send carbon at farther distances that don’t end with a zero. Bauserman’s practice is designed for this, and yours should be as well. You don’t want the first time you gap to 35 yards with your 40-yard pin to be ona 150-incher that steps into a picked beanfieldon Halloween.
Shoot Elevated
You also don’t want your first elevated shot of the season to be on something with a heartbeat. It’s pretty easy to figure out ways to shoot odd-range 3D targets that can be positioned for quartering opportunities, but not so easy to get into a tree to shoot at them.
To prepare, consider safe practice from decks, roofs, elevated shooting platforms at ranges, or out of a stand set up specifically for that purpose (don’t forget the safety harness).If you’re a saddle hunter, you’ll want to consider a few summertime sessions with your setup as well.
So, in summary, start shooting now and hit the range a few times each week. Practice at odd yardages, different angles, and with elevation. Although any target will do, a 3D deer is highly recommended.
Taking a methodical approach to summer shooting is certainly more work than just beating up a bullseye right before fall, but it’s worth it. With this style and commitment, you’ll be able to fine-tune your muscle memory and grow more comfortable with your shot process. Creating real-world scenarios at home might be what keeps you from messing up when a buck messes up in November.
Feature image via Captured Creative.
Shop
Sign In or Create a Free Account
Related
Gear
Summer Archery Drills Every Bowhunter Should Do


Gear
Remove This from Your Bow, Kill More Deer

