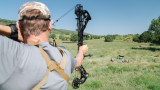
How to Sight in a Bow in 25 Minutes


We’ve all been there. Bow season is just a few days away and we decide it’s time for a new sight. Or maybe anew bow. Or, let’s be honest here, we haven’t spent as much offseason time as we shouldsending arrows downrange.
Regardless of the reason, the reality is that sometimes you need to get your bow driving tacks in short order and this is exactly the way to do it.
Step 1: Get Things Square and LevelThere’s nothingmagical about accuracy. If an arrow comes out of your bow level and square, it’s a simple matter of making sure the point of impact is where you want it to be. There’s nothing simple about an arrow that doesn’t come out level and square. This is where bowhunters spend so much time getting dialed in: They’re fighting anarrow that isn’t flying straight.
Arrows that fly poorly are almost always the result of a setup that’s either not level or out of square. So that’s where you must start.
Every bow is a little bit different in its “ideal” tuning setup, but starting with a perfectly level arrow passing through the berger button hole on the riser will get you very close to where you need to be.
I start by making a mark in the center of the bow string when measuring between the axle pivot points: that’s where I center the nock of the arrow. Then Iuse a levelon the arrow shaft to get my rest height correct. Most of the time this is going to put the arrow shaft right through that berger button hole. Again, slight adjustments might be necessary but the key here is to start with a level arrow.
From there, you want to square things up. I do this by mounting the bow in a vice and making sure it’s level both vertically and horizontally. Then step back a foot or two look right down the arrow shaft with one eye closed. The bow string should split the arrow at the nock and at the point. If it doesn’t, adjust your rest left or right as needed until it does. Again, some fine adjustments may be needed but this will get you close.
The leveling and squaring process should take around 10 minutes.
Step 2: Shoot Near the PaperI don’t go crazy withpaper-tuning. As long as I'm starting with an level, square arrow, I'll generally need three or four shots to get where I want to be.
My paper-tuning setup is simple. I use a cardboard box with a square cut out of the center that’s a couple of inches smaller than a sheet of paper. I tape a piece of paper over the hole and sit the box on top of a cooler with a block-style target behind it at the correct height to stop the arrow after it passes through the paper.
Remember, you need to be level with the height of the box when shooting. I simply kneel with one knee on the ground.
Then I shoot the paper and observe the tear. Typically, when starting with a level and square arrow, I’m going to have a bullet-hole or very close to it. If I don’t, I recheck my level and square.
In most instances, I’ll need to make a minor adjustment and the second shot will produce the bullethole I’m looking for.
I’ll spend around five minutes paper-tuning.
Step 3: Start at 10 YardsI realize that long-range shooting is all the rage and it does feel pretty good to stack a group from a distance. But we’re looking to get thingsdialed in quickly. So we’re going to start close.
By starting at 10 yards, you’re able to eyeball whether or not your top sight pin is actually close to where it needs to be. That’s much tougher to do at 20 or 30 yards. So let’s start close and make things easy.
I’ll shoot at 10 yards, adjust the pin, and shoot again. I repeat that process until I’m hitting about ½ inch lower than desired. Yes, I said lower.
From there, I move back to 20 yards and shoot. If you shoot even a moderately fast bow, you’re likely going to hit exactly where you aim. When adjusting the pin to hit slightly low at 10 yards, we compensated a bit for the added distance of 20.
Next, I’ll set my 40-yard pin. Based on previous experience, I have a pretty good gauge as to where that pin should be and you likely will on your bow as well. If you’re shooting a single-pin adjustable sight then, of course, you’ll already be good to go because you started by sighting in at the recommended yardage. Even with single-pin sights, I still start at 10 yards to get things close to where they need to be.
This entire shot sequence should have taken around 10 minutes.
The End ResultThat’s it. In well under an hour, we’ve gotten things dialed in. It doesn’t need to be more complicated than that. Sure, there are times when things won’t work the way they should. Again, when you are having trouble with consistent accuracy, check the level and square of your arrow. It’s nearly impossible to have repeatable accuracy from an arrow that isn’t flying straight, and an arrow that leaves the bow out-of-square or out-of-level will not fly straight.
Start close and get that top pin on target. From there, the rest of the process should be quick and easy.
Shop
Sign In or Create a Free Account
Related
Gear
How to Sight in a Bow in 25 Minutes
Gear
The Best Time to Upgrade Your Bow