Video: How to Remove Venison Shanks

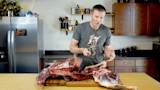
Shanks—the four forelegs on any four-legged animal—are among the most under-appreciated cuts. They’re so packed with sinew and silverskin that they’d be nearly impossible to grind for burger or chew through if cooked under high heat, but if you go low and slow all that tough stuff breaks down into delicious gelatin and leaves behind savory, flaky meat. With smaller big game, like the whitetail deer I’m working with in this video, I like to leave my shanks whole and bone-in. On larger animals like elk or moose, I’ll cut them into disks for that traditionalosso bucolook.
I’ll start with taking the shank off the front shoulder. First, find the point that you might call the elbow and cut inward above that joint until you reach the bone. Delicately and with just the tip of aflexible knife blade, ring around the joint to free the muscles of the shoulder from those of the shank. With that meat out of the way, you should be able to begin to see where the bones meet. Cut through the connective tissue surrounding the socket to expose the joint. Now you can push down on the shank against the shoulder and twist to create tension on the ligaments so you can lightly slice them away with the knife blade. Flip the shoulder over and continue to just touch the knife point against the connective tissue until the shank comes free from the shoulder.
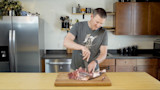
The shank on the rear ham looks more complicated to remove because of the big hamstring ligament running alongside it, but the process is still relatively simple. Begin by cutting through the fascia that creates a sheath over the top of the shank. This will separate the foreleg itself from the muscle at the top of the hamstring. For me, that chunk of meat is shank meat too, so you’ll want to remove that next. Cut through the hamstring and into what would be the inside of the knee. You should be able to gently work the tip of the knife into the joint and begin freeing up the tendons. Then you can score the fascia around the knee joint and begin twisting and creating tension to cut against. Sometimes it helps to twist and then push down hard in order to snap the tendons inside the joint. Keep cutting and cranking until the shank separates from the ham.
The last step is to remove that triangular muscle attached to the hamstring. Simply follow the sinew lines on both sides then find a point to slice straight across the top. I like to package and cook this piece along with the rear shank.
These easy steps yield venison shanks perfectly sized for most crockpots. You’ll impress people with this somewhat unusual presentation and the slow cooking will make your house smell great. There’s absolutely no reason to ever discard or leave them in the field.
Shop
Sign In or Create a Free Account
Related
Butchering & Processing
Video: How to Remove Silverskin

Butchering & Processing
Video: How to Debone a Venison Hindquarter