How to Grow Peanuts


Peanuts were most likely first cultivated in Brazil or Peru, where they have been eaten for at least 3,500 years. Nowadays we think of them as a classic American snack, but their journey here was anything but direct. Spanish explorers introduced peanuts to Europe during the beginning of the Columbian exchange, and through trade with West Africans, peanuts became a major staple there. Some years later when West Africans were abducted and enslaved, peanuts were some of the few belongings that they managed to bring with them to North America. From there, they planted them across the American South where they were known as “goober peas” which comes from the Bantu word “nguba” or peanut.
Peanuts are not typically thought of as a common garden vegetable, but they are a wonderful crop to include in your legume patch. Peanuts are packed with protein, fat, and carbohydrates— making them an excellent choice for gardeners looking to produce more sustenance from their gardens.
Peanut Growing Conditions
One of the most peculiar things about growing peanuts is that although they are in the bean family, their fruits grow underground. They begin as a typical upright flower stalk, but once they’re pollinated, they drop to the ground and work themselves into the soil for their pods to mature. For this reason, peanuts prefer very loose sandy or loamy soil and will suffer in compacted clay soils.
Peanuts have a relatively long growth period. Most varieties take between 120 and 140 days to mature. Keep this in mind when deciding where you are going to plant your peanuts because in most growing zones they will be there for the majority of the growing season. Peanuts require full sun (at least 6 hours per day) and about an inch of rainwater or irrigation per week.
As with many plants in the bean family, they can be direct-seeded, but any rodents or birds in the area will jump at the chance to snatch them up before they germinate. We’ve had success starting them in larger-sized seedling trays and then transplanting them into the garden once the danger of frost has passed. At this point the seed will be so diminished that the critters will usually leave them alone.
Whether you’re direct-seeding or transplanting your peanuts you want to give them about 6 inches of space between each plant and 2 to 3 feet between each row. This will give them plenty of room to develop big bunches of nuts under the soil. As with all legumes, peanuts fix their own nitrogen, but they benefit from the addition ofphosphorus and calcium fertilizersif your soil is lacking in either. Peanuts do not compete well with other plants, and they will suffer immensely from weed pressure so make sure to keep your garden beds as weed-free as possible for your peanuts to thrive.
Peanut Pests and Diseases
In my experience, peanuts are generally pretty pest and disease free, but there are a couple of issues to look out for. A number of fungal diseases can impact your peanut crop if conditions are constantly wet and not given time to dry off during the day. If you live in an environment where your garden is receiving constant rain and not many hot days to dry it off, you might have a difficult time growing peanuts.
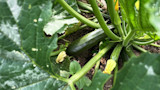
As for insect pests, the main critters to keep an eye out for are armyworms (Spodoptera sp.). These medium-sized caterpillars can be identified by a distinct black V on their forehead. If left unchecked, they will defoliate your peanuts and destroy the crop. Small numbers of them can be picked off by hand, but if their population is out of control, I recommend using the organic pesticideBacillus thuringiensisor Bt.
Root-knot nematodes can also cause problems for your peanuts, so if you know they are present in your soil consider looking for a variety of peanuts that has some resistance to nematodes. In extreme cases, you can also eradicate the nematodes by solarizing your soil using a large black plastic sheet. Though this will kill most of the beneficial soil biota as well so I would only recommend that method as a last resort.
Peanut Harvest and Use
Similar topotatoes, you’ll know it’s time to harvest peanuts when the foliage begins to yellow and die back. You can check on their progress by pulling up a few of the pods and breaking them open. If they are immature the seed and shell will be very pale in color and almost fused together. As they mature, the shell darkens, and the seed separates and forms a protective skin.
Once you’ve pulled up your peanuts you’ll want to hang the whole plant somewhere warm with good airflow for at least a week to cure. You can brush off any big chunks of soil, but you do not want to wash your peanuts at this point because that will inhibit the curing process. After a week, remove the peanuts from the plants and sort out any underdeveloped or rotten pods. At this point you can roast or boil your peanuts right away or continue to cure them for long-term storage.
Shop


Sign In or Create a Free Account
Related
Gardening
How to Grow Spinach

Gardening
How to Grow Carrots