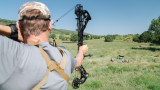
The 4 Most Common Archery Mistakes


The old adage “failure is the best teacher” couldn’t be more accurate than when it comes to archery. Shooting a compound bow has a way of magnifying mistakes and providing nearly instant feedback. Throughout years of making those mistakes, I’ve become a student of the sport and improved my accuracy in each off-season. Here are four archery errors I’ve made that I’m guessing others have struggled with, too.
Improper Draw Length
According to outdoors writer and bowhunter Jace Bauserman, the most common issue among new archers is shooting a bow with the incorrect draw length. This happens more frequently to hunters that are using a hand-me-down orused bow.
“Setting up your bow with the proper draw length is one of the most important things you can do,” Bauserman said. “You are robbing yourself of accuracy if you are shooting a bow that’s too long or too short. Find your exact draw length and make sure your bow is set up to that measurement.”
To find your draw length, stand with your back to a wall and stretch your arms out against the wall. Measure the distance from the end of one middle finger to the end of the other middle finger. Then subtract 15 from this measurement and divide by two; this is your draw length. Or you can go to anyarchery pro shopand they’ll get you fitted with the correct compound.
Inconsistent Grip
Being the only connection point between you and your bow, your grip very important but often overlooked by novice archers. To be as accurate as possible, you want your hand placement to be as consistent as possible.
The easiest way to visualize proper hand placement is to identify the life line in your palm. This is the crease in your hand that contours your thumb muscle diagonally through the center of your palm. Most professional archers and instructors recommend placing the grip along this line, toward the center of your palm where you have the least amount of muscle mass to manipulate the bow. Ideally your bow grip should parallel your life line, with the center of your grip off to the thumb side of your hand. If you find the bow jumping to the left or right when you shoot, you are likely applying to much pressure to one side of the riser and introducing unnecessary torque. Make adjustments in your palm based on this.
With these principals in mind, many archers begin to relax their hand and try to avoid contact with their fingers on the front of the riser. This is great in principal, but be mindful of what your hand is doing after the shot. Many shooters find themselves grabbing the bow immediately after the shot out of fear of dropping it. Instead, just make light finger contact in a location that feels familiar and can be repeated.
Improper Release Technique
Whether you are learning to shoot a bow for the first time or have been shooting all your life, Bauserman highly recommends ahinge release instead of a caliper style trigger release. Producing a repeatable release is equally important as proper bow grip. Using a hinge-style release rather than a trigger partially removes the shooter from the equation for a more repeatable shot. Hand placement and even pressure are key to a consistent release.
“Let your release fire your bow, not the other way around,” Bauserman said. “When aiming, trust your process, trust the pin float, and let the release fire on its own terms.”
As Mark Kenyon has pointed out in the past, this is one of the easiest ways toremedy target panic, which often includes punching the trigger when the pin touches the bullseye. For many archers, a back-tension release gets rid of the anxiety that causes rushed shots and errant arrows.
Not Enough Practice
This one may seem obvious, but many bowhunters simply don’t practice enough. The goal of practicing is to create an entire shot sequence that is second nature, so muscle memory kicks in for the moment of truth. This isn’t something you can do in a couple weekend sessions before opener.
While many archers want to prepare for long bombs at 40, 50, and 60 yards, not enough practice inside of 20. Practicing at greater distances is useful for highlighting imperfections, but most hunters will be sitting over deer trails that are less than 25 yards away. These are the shots with which you need to be most proficient.
“I’ve shot my three biggest whitetails at 8, 10, and 13 yards,” said MeatEater’s hunting editor, Spencer Neuharth. “I’d almost rather have those bucks at 20 or 25 yards. At 10 yards, your pins and peep sight are covering up so much of the deer that you’re almost not ready for finding the vitals at that range.”
You should also be sure to practice the same way you’ll be hunting: with broadheads, from elevated positions, with or without a quiver, in wind, and wearing hunting clothes. Drilling the bullseye on a block target in your manicured backyard is great, but it’s not the same as shooting from a tree at a 3D whitetail. You can find more tips for better practice in Tony Peterson’s article“The Archery Routine that Will Help You Kill More Deer.”
With that said, there is such thing as too much practice. As soon as your form starts to slip and you feel yourself getting shakier with each shot, it’s probably time to call it a day. By shooting too much, you can do more harm than good by reinforcing bad habits. Rather than trying to accomplish everything in a 45-minute session, split it up into two 20-minute sessions or three 15-minute sessions.
By taking stock of your equipment and form, you can fix almost all of your archery ailments. Piece by piece, it’s easy to go from regularly sailing arrows to killing the bullseye every single time. That will translate to killing more critters.
Feature image via Captured Creative.
Shop
Shop AllSign In or Create a Free Account
Related
Hunting Gear
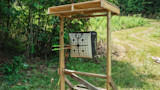
Photos: How to Build an Archery Target Stand

Hunt
The 5 Most Common Mistakes Whitetail Hunters Make