
In parts 1 and 2 of this 3-part collection of field butchering tips, we discussed how to break down big game animals for packing purposes. If you’ve made a clean kill, field butchering animals is a pretty straight-forward process.
But, not all kills are the result of a single shot to the vitals. Sometimes, due to poor shot placement, additional field butchering is necessary before your pack-out can begin. An errant shot is a problem every hunter will have to deal with eventually. If you fail to properly care for a poorly shot animal, you’ll end up with foul-tasting meat that could even make you sick.
First, it’s important to point out that the best way to avoid poor shot placement is to practice at the rifle range. This builds up the accuracy and confidence that is necessary when it’s time to pull the trigger during your hunt. For a swift kill and minimal meat wastage, try for a broadside, double-lung shot through the center portion of the ribcage directly behind the front shoulder. With this shot, there is virtually no meat damage and the animal will bleed out in seconds.
Bullet choice can also make a difference. High-quality bonded or monolithic bullets tend to do less meat damage because they’re less likely than to fragment into dozens of pieces than cheap, soft-point, cup and core bullets.
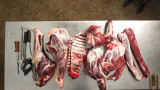
However, bad shots can happen no matter what bullet you’re shooting. How you clean up the results of these inevitable (and hopefully only occasional) shots will determine what you’re left with in terms of edible meat in the freezer. Shots to the gut, spine, shoulder and hip areas tend to damage the most meat. For our purposes I’m going to break “meat damage” into two categories. The first is structural damage to flesh caused by the bullet or broken bone.
The second is potential meat damage or contamination caused by gut shots that release digestive fluids, and stomach or intestine contents.
A hit to the spine, shoulder or even the hips, usually anchors an animal quickly but it can also do a tremendous amount of damage to the surrounding muscles.
Blood Shot
Once, on a late season elk hunt, a buddy shot a cow in her bed. Despite a good hit to the vitals, the elk managed to stand up and I urged my friend to make a quick follow-up shot. A second shot into the shoulder bone killed the cow instantly. Unfortunately, the entire upper half of the elk’s front quarter was destroyed.
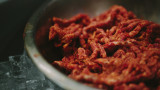
The blood-shot, jellied meat was littered with tiny bone fragments and many pounds of meat were lost. If you end up with a quarter laced with bone chips and bloody meat, you’ll need to do some generous trimming. Blood-shot meat will appear very dark and bruised and it is usually covered with a viscous, bloody jelly. This leaves a horrible taste in the adjacent muscle.
Trim away any bloody wound channels and bone fragments until you’re left with nothing but clean meat. You may need to debone a quarter to do this properly.
Gut Shots
Now, let’s say you killed a deer with a quartering away shot but your entrance wound was a little far back in the paunch. It’s obvious that the gut cavity has been punctured from the smell and the undigested food and intestines pushing through the entrance wound.
Gut shots release fluids and bacteria that can quickly spoil any meat they touch but it’s possible to minimize the damage. The gutless quartering method would be a good choice here if you need to pack the animal out in pieces.
If you carefully remove all the quarters, backstraps and neck meat first, there’s less of a chance they’ll get contaminated by gut fluids. But what about the heart, liver and tenderloins? You’ll still need to gut the quartered carcass to retrieve these pieces.
After gutting, inspect what you want to keep for bullet damage and obvious surface contamination. With any gut-shot animal, I would leave the liver behind because of its proximity to the stomach and intestines.
Next, it is imperative to properly wash the stomach cavity, rib cage, tenderloins and any other surrounding meat you’ll be consuming. Ideally, you’ll have a creek or some snow nearby. Otherwise, you might have to sacrifice your drinking water. It’s also a good idea to give everything a good wipe and dry with a towel or extra game bag.
The most important factor in successfully dealing with poor shot placement is time. The longer damaged or contaminated meat sits, the greater the impact to the surrounding meat. The faster you clean up a gut-shot animal or trim a blood-shot quarter, the more meat you’ll be able to salvage and the better that meat is going to taste.
You can overcome a bad shot with the proper field butchering steps. And, if nothing else, poor shot placement will teach you to wait for the ideal shot on your next hunt.