
I still remember the first time I was introduced to sous vide. The old, intimidating industrial models were large devices that looked like something you would see in a science lab. I was so confused by how the contraption worked, specifically when instructed to “place food in bath.”
I have since come to realize that sous vide is actually incredibly useful for cooking wild game, especially now that there are small, easy and relatively inexpensive models on the market for the everyday cook.
Before I get too deep into details, let me give the short answer of how it works and how wild game can really benefit.
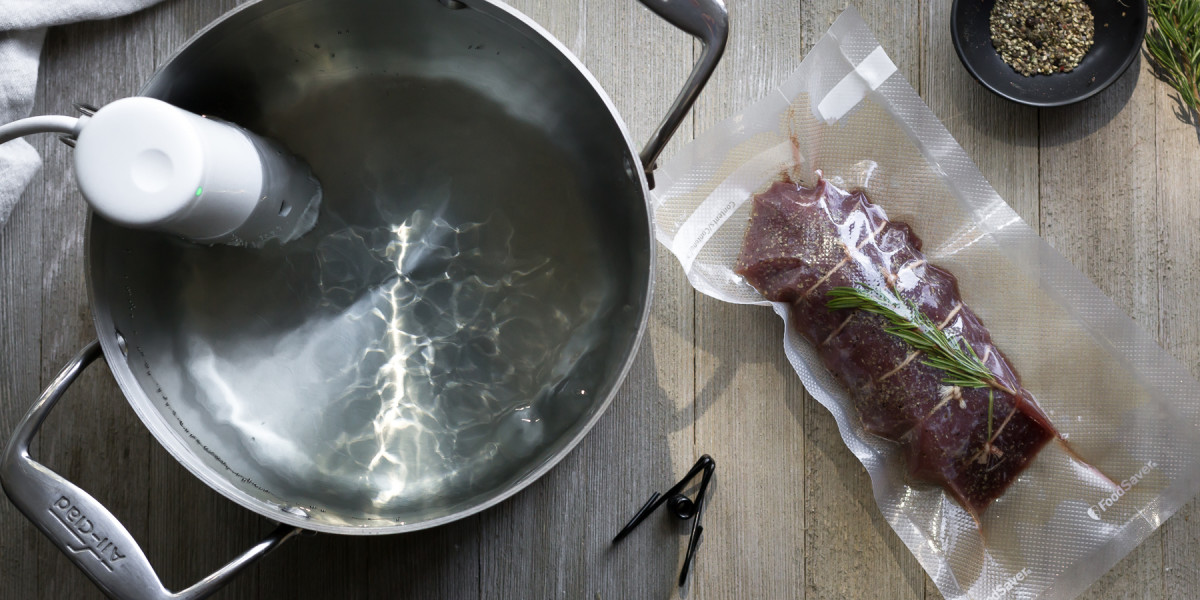
A sous vide device is used to heat a large container of water to an exact temperature. The device will continuously circulate the water to make sure it stays at the exact degree programmed. Food is then sealed in a plastic bag and dipped inside to gently poach for hours or even days until the meat has cooked to the desired texture or temperature. You can walk away, let it do its thing, and come back to perfectly cooked food.
Sous vide guarantees consistent results every time. It’s a method for cooking with control and uniformity.
One of the number one complaints I hear about eating wild game is that it is dry or tough. Anyone who has ever cooked a wild animal has experienced this, and that is because they are athletes! They migrate long distances, climb mountains, and do whatever it takes to survive. They are lean machines and their muscle tissues are well developed. Wild game lacks the protective fat barrier and cooks faster than their domestic counterparts, so there isn’t a lot of wiggle room for mistake. This is where the magic of sous vide comes in.
With traditional cooking, you have a small margin for error because you are cooking with high, direct heat from the outside. This makes it hard to determine internal temperature without the use of a thermometer. Sous vide cooks evenly all the way through, meaning the meat is cooked to the same temperature from the edge to center. This is very important to remember because the doneness of meat is determined by the maximum internal temperature reached during the cooking process.
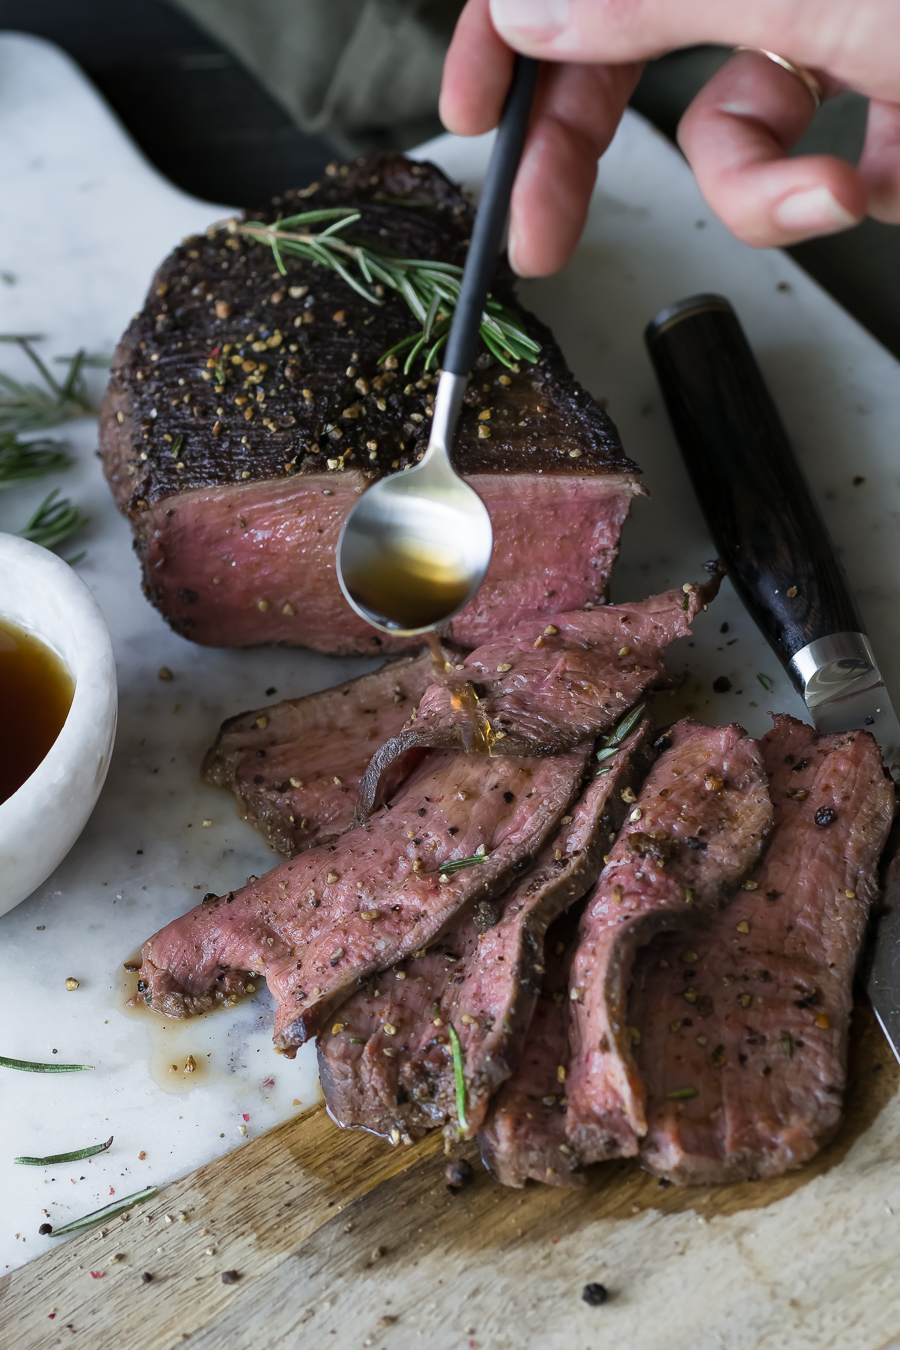
For example, if you are cooking something you want to be served medium-rare (venison backstrap or duck breast), you will program the device to the exact temperature you want the final result to be. It will never cook beyond medium-rare if the temperature of the water does not rise. You have to cook it for a certain length of time in order to reach pasteurization, but you can cook it for hours past that time and the doneness of the steak will not change, only the texture will.
Another benefit to sous vide is that the temperatures at which you cook is a lot lower than traditional methods. When meat is cooked at very high heat, the fibers begin to contract and squeeze the juice out. Sous vide is a more gentle form of cooking and helps to prevent too much moisture loss.
You will notice that your wild game is significantly more juicy after your first cooking session with sous vide. On top of that, because the meat is cooked in a sealed bag, the liquids released have nowhere to go. The meat essentially braises in its own juices, infused with the flavors seasoned in the bag.
Sous Vide Tips
Always use a container filled with enough water to completely submerge the food you are cooking. The larger the container of water, the longer it will take your sous vide to reach the desired temperature.
I’m a traditionalist, so I like to bring meat to room temp before placing in the bath so as not to drop the water temperature. If you’re cooking frozen meat, the temperature of the water drops dramatically and you will need to increase the time of cooking. If you’re cooking a large piece of meat for a very long period of time (like a shoulder for 72 hours), you can use plastic wrap or layer several ping pong balls on top of the water to act as an insulator so it won’t evaporate.
You’ll want the food to be fully submerged. Squeezing as much air out as possible from the bag will prevent it from floating to the top, as will using a small binder clip to secure it to the side of the container.
I like to season meat hours or even a day in advance before cooking, usually with a simple mix of salt and pepper. You can add aromatics, such as garlic or rosemary, to your meat inside the sealed bag while cooking. These infuse the flavor of the liquids that are released from the meat more so than imparting flavor to the meat, but these leftover liquids can make a really great pan sauce after the meat has finished cooking . However, be careful not to go over the top because flavors intensify when cooking for extended periods of time.
For meat that will be cooked over a long period of time, you can pre-sear before placing in the bag for added depth of flavor. To reverse sear a steak after it has been cooked sous vide, allow it to rest and pat dry. You want to let the temperature of the meat fall so that you don’t risk over-cooking, but can still get a nice crust. Use a very hot sauté pan or cast iron skillet with a little oil or butter to finish.
Most of the guidelines you read online will tell you to vacuum seal your meat for the water bath. I don’t really find that necessary. Sometimes sucking all the air out can smash the meat and leave goofy indentions that are not visually attractive on the plate. Often times I use regular Ziploc freezer bags and achieve great results. For extra precaution, you can double bag to ensure there are no holes where the water can seep in. As always, be sure to choose BPA free plastics.
Check back for A Beginner’s Guide to Sous Vide for Wild Game, Part 2. Until then, checkout one of my favorite sous vide recipes for venison roasts.
Feature image by Danielle Prewett
Shop
Sign In or Create a Free Account
Related
Cooking Techniques
A Beginner’s Guide to Sous Vide for Wild Game, Part 2

Cooking Techniques
How to Cook With Caul Fat
Conversation